Pages

Thursday, May 29, 2014

Stretching Shoes and Why Sometimes Pinterest is a Liar

Why is it that when I try on shoes in the store, they fit fine. I walk up and down the aisle, strutting my stuff, and they are PERFECT. Perfect, like "How did I ever walk without these shoes" perfect.

High on new-shoe-smell, a maximum of 20 minutes later, I return home with my prize.  Triumphantly, I put my new striped wedges on (with much pomp and circumstance), and instantly I realize ~ they KILL MY FEET! Not only do they hurt, my husband, looks at my feet and says to me "those shoes look painful honey".

WTH (and by WTH, I really mean WTeff, but don't tell my Mom I said eff.) 

So what is a girl to do?

Return them?

Nah, the sensible thing to do would be to search on Pinterest for a solution!

So, I search: 

"how-to stretch tight shoes", and
"feet too big, shoes too small", and
"grow shoes, shrink feet"

I browse various posts, and ultimately decide on the following (mostly based on the sheer confidence in the claim ~ Shoes will be at least one size larger!):
  1. To stretch leather or canvas shoes, fill a Ziploc baggie 1/3 full with water. 
  2. Insert baggie into the shoes.
  3. Place shoes in the freezer.
  4. Leave overnight.
  5. Take shoes out of freezer.
  6. Remove ice baggies. 
  7. Shoe will be stretched one full size (Yes!!!)
Okay, I'm game. After all, I live and breathe by Pinterest. It has never let me down.

So I follow the instructions (and even take pictures of my shoes in the freezer, cuz that's not weird).

Tick tock.

Tick tock. 


stretching shoes, pinterest, life hack


I pull them out of the freezer to defrost, and I'm almost as excited as if I was defrosting a tenderloin...

Finally, the moment of truth ~ I pull the ice out, and slip the new shoe on. They're cold. The cold feels good.

The.  Shoes.  Do.  Not.

And now I really do say "eff" for real, as I realize: Pinterest lied.

This Pinterest Promise of a DIY Shoe Stretching Solution didn't work for this Sore Footed Slightly Ticked Off Chic.

So, as I write this cautionary tale, sitting in my coral striped wedges, wearing ultra thick sports socks, I beg of you to remember: you can't believe everything you find on Pinterest.

*disclaimer - no shoes were harmed in this blog post. 

Don't forget to subscribe to my newsletter! (Above) 

If you would like to join in some fun link parties, head on over HERE

Wednesday, May 28, 2014

Simple Hand Painted Sign Tutorial

Simple Hand Painted Sign, Rustic sign, DIY rustic sign, Bon Appetit

Once in a while, I get the urge to make a sign, but I don't have a Silhouette Machine. Sometimes I sulk about that. Sometimes I put on my big girl pants and just deal. Life is full of disappointments, right?

So, if you're poor like me, but still want to make a cute sign, all it takes a little more time...and a little more patience. 

(Perhaps a glass of wine cup of coffee or two.)

The idea is simple. If you can cut, trace, and color between the lines, 
you're all set!

1. I found a piece of board, and gave it a coat of black paint. I used MinWax PolyShades in Black Gloss, but you could use stain, craft paint, whatever is on hand. 

2. I chose a free font that I liked, and downloaded it to Microsoft word. 

3. I enlarged the font to around 200, and printed out the phrase I wanted to use. Depending on the height of your board, you will need to adjust the font size accordingly. 

4. Next, I cut the letters out and taped them to my board. (Tricky, eh?)

Simple Hand Painted Sign, Rustic sign, DIY rustic sign, Bon Appetit

5. Using a ball point pen to trace around each letter, I pressed firmly, so that it would indent the wood, to help me paint between the lines!

Simple Hand Painted Sign, Rustic sign, DIY rustic sign, Bon Appetit

6. Once my phrase, Bon Appetit, was pressed into the board, I filled the letters in with white craft paint. 

7. Let the paint dry for several hours. (Insert coffee, or whatever you're drinking, here.)

8. Once the paint was good and dry, I used sand paper to "age" the sign. 

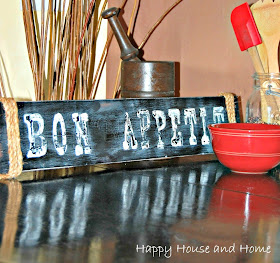
9. I wrapped each end in jute rope and secured it with hot glue, just for kicks and giggles. 


Simple Hand Painted Sign, Rustic sign, DIY rustic sign, Bon Appetit

10. Voila! A rustic sign ~ made without needing a Silhouette machine.

Simple Hand Painted Sign, Rustic sign, DIY rustic sign, Bon Appetit

How about you? Do you have a Silhouette? 
Or do you plod through life without one? 
Most importantly, do you think Big A should get me one? 
(Please leave HIM a comment!) 

Don't forget to subscribe to my newsletter! (Above) 

If you would like to join in some fun link parties, head on over HERE

Sunday, May 25, 2014

Merry Monday Linky Party #4

Merry Monday Linky Party, Linky Party, Link up, Blog

Welcome to the 4th Merry Monday Linky Party!

  • First, I want to thank everyone that participated last week and linked up their blog post. You were all very busy being creative and linked up wonderful posts.
  • Second, you're party hosts were busy sharing your link ups on either Twitter, FB, Pinterest (some to several group boards), Stumbleupon, and Google+. We want to help get your posts out to as many people as possible and would appreciate if you share the party and help us out too.
  • Third, I want to welcome the a new co-hosts to the link party! This means that your link ups will now been seen on 4 different blogs, giving you more exposure. How great is that?! Also, each host picks their own features, so make sure you visit their blogs too.
  • Fourth, all features will be pinned to the Merry Monday Linky Party Pinterest board.
  • Fifth, If you're intrested in being a featured co-hosts for the party, please sign up!

On to the Merry Monday Linky Party 4!

Meet the hosts of this party

*It's not necessary, but we would appreciate a follow in at least one of our social media platforms*

Merry Monday Linky Party, Linky Party, Link up, Blog

Host Erlene @My Pinterventures

Pinterest addict that loves to try new recipes, crafts, DIY projects, and more. Come with me on my daily adventures inspired by Pinterest and my fellow bloggers.
Happy House and Home, Merry Monday Linky Party, Linky Party, Link up, Blog

Co-host Julia @Happy House and Home

Happy House and Home is a blog about affordable DIY and Home Decor, with a few recipes thrown in, so that we can keep body and soul together!
Marilyn's Treats

Co-host Marilyn @Marilyn's Treats

I'm a wife, mother, and grandmother. Baking, collecting Cook Books and recipes are my addictions. Follow me along my Culinary journey as I share it on Marilyn's Treats.
treana_lawren_0071

Co-host Treana @House of Bennetts

Treana began working as a lawyer around the same time that she got engaged AND bought a house. Along with her fiancé, LB, they are fixing up a 1950's ranch and documenting their DIY projects for the house and the wedding over on House of Bennetts.

Most Clicked Feature(s)

There was another tie for most clicked links again. Here are the two most clicked...

Tips to de-junk and get organized

Tips to De-junk and Get Organized @Fearlessly Creative Mama

Kathleen at Fearlessly Creative Mama gives you some tips to help de-junk your home and get it organized. She even shows you a quick tutorial on how she made her own Washi Tape storage.
10 Favorite Blogs

My 10 Favorite Blogs @Driftwood Gardens

Jen at Driftwood Gardens shares her 10 most favorite blogs and why she loves them. There are a lot of great blogs on her list. Many of the blogs she reads are some that I like too.
 

My Feature Pick(s)


Asian Style Meatballs @ A Bountifl Love

Khit at A Bountiful Love shared this recipe for Asian Style Meatballs with Home Made Sweet Teriyaki Sauce and they are absolutely delicious! I made them for my three picky kids and husband and they were gobbled up in minutes. 

Features will be pinned to my Merry Monday Link Party Board

If you were featured, grab the Merry Monday Linky Party feature button and display it on your blog, feature page, or sidebar.


Grab button for My Pinterventures
<div class="My Pinterventures-button" style="width: 150px; margin: 0 auto;"> <a href="http://www.mypinterventures.com" rel="nofollow"> <img src="http://i845.photobucket.com/albums/ab20/ErleneA/MerryMondayLinkyPartyFeatured_zps39073631.png" alt="My Pinterventures" width="150" height="150" /> </a> </div>

Permalink back to blog

http://mypinterventures.com/merry-monday-linky-party-4

Okay, this is the boring stuff, but necessary. There are a few guidelines to help get this party started and are posted in the green box below. If this is your first linky party, you can read this post on Linky Party Basics for Hosts & Guests.

Party Guidelines New May1

Help grow this party. Grab my Merry Monday Linky Party button and post it on your link party page, sidebar, or post.


Grab button for My Pinterventures
<div class="My Pinterventures-button" style="width: 150px; margin: 0 auto;"> <a href="http://mypinterventures.com" rel="nofollow"> <img src="http://i845.photobucket.com/albums/ab20/ErleneA/MerryMondayLinkyParty_zps1a19922b.png" alt="My Pinterventures" width="150" height="150" /> </a> </div>

Subscribe to the Merry Monday mailing list and get advanced notice of when the party goes live!


***This email list will only be used to for the Merry Monday Linky Party notification***

It’s time to link up!

Sharing is caring! We would appreciate a Tweet about the party to help spread the word.  


Friday, May 23, 2014

Growing Potted Herbs

planting herbs, how to plant herbs, grow herbs


Hello! Thanks for stopping by!

Today I'm showing you a little idea that I got from Ms. Toody Goo Shoes. She made the most adorable little planters, which were used in a gorgeous centerpiece and then given as gift. And that gave me an idea! Go check out her planters (and while you're there, check out her Nutella Mousse Pie).

So, I had some tiny herbs, that I grew from seed, that I've struggling to keep alive in my windowsill. They were completely in need of a transplant, but all I had were huge window box planters. I did a search of the house and basement, but couldn't find anything suitable, or small enough. As luck would have it I was on the internet and came across Ms. Shoe's centerpiece.

That gave me the idea to use seperate cups for the individual herbs (I actually used candle holders) and keep them together on a tray.

I grabbed a tray and spray painted it black, and then grabbed the canndle holders.


planting herbs, how to plant herbs, grow herbs


I planted the basil, cilantro and oregano each into its own candle holder. (Okay, yeh, the herbs are a little scrawny, but have faith!) 

planting herbs, how to plant herbs, grow herbs

Next I added some rocks to the bottome of the tray. Just for fun. (I'm sure Mister Kit-e-Kat will have them all over the kitchen floor by tomorrow). 

planting herbs, how to plant herbs, grow herbs

Now all I have to do is sit back and wait for them to G-R-O-W, so that I can eat them!

planting herbs, how to plant herbs, grow herbs

What do you have growing this summer? Do you grow your own herbs? 

Don't forget to subscribe to my newsletter! (Above) 

If you would like to join in some fun link parties, head on over HERE

Tuesday, May 20, 2014

Painting the Front Door

painting the front door, painting doors, paint doors black, black front door

Hello there! I'm glad to have you here! 

The weather has been pretty nice, so, Thank You Mother Nature! I can finally get something done! 

The front door has been on my list of things that needed painting. It's bothered me since we built our house. It was white while the shutters were black.  I felt it stuck out like a sore thumb. Basically, I've wanted a black front door for three years. 

In this photo, you can see how it just looks so, well, white. 

painting the front door, painting doors, paint doors black, black front door

Here too, only dingy white. Kinda lame, right? 

painting the front door, painting doors, paint doors black, black front door

And on the inside, I was as non-plussed. 

painting the front door, painting doors, paint doors black, black front door

Obviously, I was all in for painting the door. However, I wasn't so sure about Big A. But to my surprise, when I mentioned painting the door, he agreed. And, even more surprising, he even helped tape (I hate taping). 

Like a good wife, I sat on the sofa, 
and gave him helpful taping hints. 
He really liked that.

painting the front door, painting doors, paint doors black, black front door

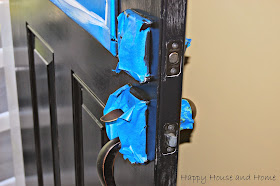
Taping around the hardware was a pain. BUT to save you some time: I've since seen a tip to use tinfoil to cover hardware. Shame I didn't see that before because here's what we came up with: 

painting the front door, painting doors, paint doors black, black front door

Pretty, huh? 

First, I primed the door. The door was white anyway, so I pretty much just put the primer on as quickly as I could. 

When the primer was dry, I painted the first coat of black and let that dry. It didn't exactly look fabulous at this point ~ more like frightening. So, I admit, I had a tiny panic attack that this might turn out to be a disaster. 

painting the front door, painting doors, paint doors black, black front door

Because I couldn't wipe it off at this stage, I kept painting, and after two more coats and I was done! 

Once there were a few coats on, the door looked great! 
(We also hung a new screen door.)

painting the front door, painting doors, paint doors black, black front door

A couple of painting tips:
  • You don't need to take the door down, you just need a step stool.
  • Start painting in the morning so that the door will be dry by bedtime, and you can close and lock your door!
  • Clean the door and wipe it down before you paint or prime.
  • Once the first coat is on, paint slowly and try to avoid brush marks and drips.

  • Use a FABRIC drop cloth. If you step on a drip on a plastic drop cloth, you will track it through the house! 

  • Let the paint dry really well between coats. 

  • Use semi-gloss paint. Doors get dirty, and this is easy to wipe down. 


 Here is another (faraway) view: 

painting the front door, painting doors, paint doors black, black front door

Here is the indoor view: 


Here is Winnie ~ happy with the new black door! 

painting the front door, painting doors, paint doors black, black front door

All and all, I'm super happy with the new painted front door. It doesn't stand out, and I barely notice the change from inside or out ~ but I feel that's a good thing. It means it looks natural and therefore it doesn't catch my attention.

That's what I tell myself anyway. :)

So what about you? What color is your front door? Did You paint it yourself? 

painting the front door, painting doors, paint doors black, black front door

I'd love to know what you think, or what you've been up to, so leave me a comment and say hello! 

Don't forget to subscribe to my newsletter! (Above) 

If you would like to join in some fun link parties, head on over HERE


Sunday, May 18, 2014

Merry Monday Linky Party #3

Merry Monday Linky Party300

Welcome to the third Merry Monday Linky Party!

  • First, I want to thank everyone that participated last week and linked up their blog post. I've shared your posts on either Twitter, FB, or Pinterest (some to several group boards), and will try to help promote your link ups where I can. My personal FB page is finally working again (FB hates me) and I'll be visiting more of your FB fan pages too.
  • Second, I want to welcome two new co-hosts to the link party! This means that your link ups will now been seen on 3 different blogs, giving you more exposure. How great is that?! Also, each host picks their own features, so make sure you visit their blogs too.
  • Third, thank you to everyone that hopped around and visited other link ups. There were definitely more clicks on everyone's links, which means more of you were visiting others!
  • Fourth, all features will be pinned to the Merry Monday Linky Party Pinterest board.
  • Fifth, I'm looking for a few permanent or temporary co-hosts for the party! If you're interested, please sign up here.

On to the Merry Monday Linky Party 3!

Meet the hosts of this party

*It's not necessary, but we would appreciate a follow in at least one of our social media platforms*
My Pinterventures
Host Erlene @My Pinterventures
Happy House and Home
Co-host Julia @Happy House and Home
Marilyn's Treats
Co-host Marilyn @Marilyn's Treats
 

Most Clicked Feature(s)

We had a tie on the most clicked link up last week and ended up with two!
Recycle Glass Jars for Spices
Misty shows you how you can recycle Starbucks Frappuccino bottles and use them in the kitchen for spices. Great inspiration on recycling and how we can all try to reuse glass bottles. She also has a fabulous blog on how to save money and she shares her tips/tricks - who doesn't like saving money?
monbblogo
Jen shares some basic blogging etiquette in this post. She also has a blogging section on her blog where she shares blogging tips and information that she has learned while blogging.

My Feature Pick(s)

Coffee Table Tray DIY
Treana from House of Bennetts made this fabulous tray from a thrift store find. It looks gorgeous. Her blog is full of DIY and super fun to read!

Features will be pinned to my Merry Monday Link Party Board

If you were featured, grab the Merry Monday Linky Party feature button and display it on your blog, feature page, or sidebar.


Grab button for My Pinterventures
<div class="My Pinterventures-button" style="width: 150px; margin: 0 auto;"> <a href="http://www.mypinterventures.com" rel="nofollow"> <img src="http://i845.photobucket.com/albums/ab20/ErleneA/MerryMondayLinkyPartyFeatured_zps39073631.png" alt="My Pinterventures" width="150" height="150" /> </a> </div>

Permalink back to blog

http://mypinterventures.com/merry-monday-linky-party-3

Okay, this is the boring stuff, but necessary. There are a few guidelines to help get this party started and are posted in the green box below. If this is your first linky party, you can read this post on Linky Party Basics for Hosts & Guests.

Party Guidelines New May1

Help grow this party. Grab my Merry Monday Linky Party button and post it on your link party page, sidebar, or post.


Grab button for My Pinterventures
<div class="My Pinterventures-button" style="width: 150px; margin: 0 auto;"> <a href="http://mypinterventures.com" rel="nofollow"> <img src="http://i845.photobucket.com/albums/ab20/ErleneA/MerryMondayLinkyParty_zps1a19922b.png" alt="My Pinterventures" width="150" height="150" /> </a> </div>

Subscribe to the Merry Monday mailing list and get advanced notice of when the party goes live!


***This email list will only be used to for the Merry Monday Linky Party notification***

It’s time to link up!

Sharing is caring! We would appreciate a Tweet about the party to help spread the word.  

Friday, May 16, 2014

Make an OLD table like NEW!

paint a kitchen table, polyshades, how to paint a kitchen table, kitchen decor, painting, kitchens

Hello there! What have you been up to this past week?

I've been pretty busy. The weather has been so nice, and I was finally able to get outside. Yessss! No more secretly using spray paint in the basement!

This pedestal table was the first thing on my "nice weather to-do list".  Look at that top. Um, Ew.


paint a kitchen table, polyshades, how to paint a kitchen table, kitchen decor, painting, kitchens

Despite it's current state, it's been in our family for ages. I grew up eating dinner at this table. I have so many memories of sitting around that table...

Julie, eat your dinner,
Julie, stop laughing at the table, 
Julie, stop throwing peas at your sister, 
Julie, where were you last night, 
Julie, you're grounded for the next twelve years...

Ahhhh. Good times.

My parents eventually handed the table down to me, (no doubt wishing those memories would go away). Over the years, I managed to destroy the top of the table.

Well, in my defense, I had a little help from these guys:


(They look nice, but they're like the terminator team. 
We should re-name the little one Wreck it Ralph.)

The table top has been hammered, scratched, glued, and even had pumpkins rot on it. I've wanted to re-finish it forever. 

I decided to paint the top and leave the rest of the table in its original color. I went with black to match my kitchen island, which has black cabinets. Also because I simply love the look of black table tops with the natural base. Love.

My original plan was to prime the top, and then paint it, and then polyurethane the heck out of it.  I looked around at all of the paints offered by The Home Depot, and while in "The Home Depot Vortex", I ran into Polyshades by Minwax ~ and took a gamble.


The directions said that you do not need to prime OR sand because the "stain" would adhere to anything. However MY table surface had been so damaged over the years I wanted to start with a clean slate. So I sanded down to the unfinished wood.

paint a kitchen table, polyshades, how to paint a kitchen table, kitchen decor, painting, kitchens

I started with 80 grit sandpaper and worked my way to 120 for a smooth finish. This took me about an hour.

paint a kitchen table, polyshades, how to paint a kitchen table, kitchen decor, painting, kitchens

The table still had a few dings and divots, but it was smooth. I taped off the edge of the table. (After all was said and done, I changed my mind, and ended up painting that edge.)

paint a kitchen table, polyshades, how to paint a kitchen table, kitchen decor, painting, kitchens

After one coat with the Polyshades, this is what it looked like. Very streaky. I was beginning to question my choice of Polyshades. BUT...

paint a kitchen table, polyshades, how to paint a kitchen table, kitchen decor, painting, kitchens

After the second coat the table looked awesome, with a solid black finish. (However, being the kitchen table, I used two more coats and I had a very glossy finish. Perfect for the kitchen, and high use.)

paint a kitchen table, polyshades, how to paint a kitchen table, kitchen decor, painting, kitchens

Using the Polyshades it took me two days to paint four coats. Part of the delay was a rainy day...

A note about the Polyshades (I'm not being paid to review Polyshades or any fun stuff like that) ~ I am in love. However, Polyshades has mixed reviews on Amazon. Criticism seems to be from people complaining that this is not a stain and that it doesn't apply like a stain. However, I bought it as a poly - with color it it. It applies like a polyurethane, but is the color of paint. It leaves a high gloss finish and was perfect for a kitchen table. I'm so glad I tried it. If you have a table or chairs, that don't need a ton of sanding, it saves using primer.  I'm totally using the Polyshades to repaint my black front porch rocking chairs.

Don't forget to subscribe to my newsletter! (Above) 

If you would like to join in some fun link parties, head on over HERE