Pages

Saturday, March 29, 2014

Meatloaf Cupcakes

meatloaf recipe, meatloaf cupcakes, meatloaf, mashed potatoes

Anyone hungry?

Me too! I'm always hungry! But in my house, it's difficult to come up with something everyone will eat. Big A is meat and potatoes all the way. I like most anything, but generally a seafood person. The two teenagers eat most everything, but they eat A LOT. And the little five year old is picky with a capital P, and suspicious of everything I cook. It's a challenge. 

BUT, these Meatloaf cupcakes are a huge hit with my family. Everyone likes them, and they're filling. (And, I have seafood on nights out!) 

The're the perfect family dinner. (Admittedly, this recipe may not be featured on the menu at The Ritz, and I'm pretty sure it's not in any of Gordon Ramsey's cookbooks. However, it will make your family very, very happy.) 

Now, they're a cute shape, and you "frost" them with mashed potatoes - adorable. But the real treat is that they're delicious! 

You can use your favorite meatloaf and mashed potato recipes, OR, try my recipes. (Pretty please with a cherry on top! They are so good!) 

Either way, make up a batch of mashed potatoes. Make some meatloaf mix. And put together a really fun and easy dinner! 

Here are my recipes: 

The Best Meatloaf 

2 slices white bread
1/2 cup buttermilk
1/2 lb ground pork
3/4 lb 85% lean ground beef
1/4 cup Parmesan cheese, grated or 1/4 cup Romano cheese
1 egg, beaten
2 garlic cloves, minced
2 tablespoons fresh parsley, chopped

Tear up the bread and add the buttermilk and beaten egg. Let the bread soak up the egg and milk for a few minutes.. 

Add all other ingredients and mix well.

Take handfuls and make meatballs that will fit in the muffin tin. Press one large meatball in each hole. (Never roll meatballs too much. You want them kind of "lose"). 

NOW, Pipe your mashed potatoes on each cupcake.  (Scroll down for the best mashed potato recipe!) 

Bake at 350f for 1 hour. 


meatloaf recipe, meatloaf cupcakes, meatloaf, mashed potatoes


meatloaf recipe, meatloaf cupcakes, meatloaf, mashed potatoes

meatloaf recipe, meatloaf cupcakes, meatloaf, mashed potatoes

Super Good Mashed Potatoes

 8 medium potatoes

1 cup sour cream
8 ounces cream cheese, room temp
4 tablespoons butter, room temp
1/4 cup chives
1 1/2 teaspoons salt
1/2 teaspoon pepper
2 garlic cloves, minced
1 1/2 teaspoons onion flakes
1/2-1 cup thinly sliced green onion
bacon bits or 2 slices cooked crumpled bacon
milk (add just enough to make them the right consistency)

Peel and cut up the potatoes. I make them all the same size, usually in fourths. You don't have to be too accurate, just eye-ball it! 

Put them in cold water and bring to a boil. Boil for about 30 minutes. I take a fork and stab a potato at this point, if it slides off the fork, it's done. If not, give it a few more minutes. 

When you have sliding potatoes (!), they're done, so drain 'em. Pop them back in the pan and mash with a potato masher (not a mixer). Add all other ingredients and stir.

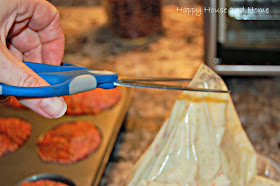
If using as meatloaf cupcake frosting, put the potatoes in a pastry bag or, in my case, a gallon Ziploc. Cut the corner and "Pipe" the potatoes on top of each cupcake.


meatloaf recipe, meatloaf cupcakes, meatloaf, mashed potatoes

Again, bake at 350f for 1 hour. 

These are pretty messy, so it's a good idea to put a large cookie sheet in the bottom of your oven if the meat juices bubble over. 

The mashed potato recipe makes a LOT! Save the leftovers for another day! I freeze mine, and they're just fine to use after a few weeks. 

Let me know if you try them. I'd love hearing from you! I'd also love for you to follow along on FB, Pinterest, OR 

Don't forget to subscribe to my newsletter! (Above) 

If you would like to join in some fun link parties, head on over HERE


Tuesday, March 25, 2014

Hand Painted Wooden Sign

hand painted sign, western decor

Flavor of the month: Western Decor. I love it. I want a little. Maybe a lot. 

But for now, I'm going to start with just a little of the Old West in my home, and see how it goes. 

There are plenty of catalogues I love, selling very expensive (but beautiful, cozy and charming) Western themed decor. However, I thought, starting off slow, it's easiest to DIY a little bit of Western Decor, and see if I like it in my home. 

The first thing on my list was to make a hand painted sign, and I found inspiration for this idea HERE 

hand painted sign, western decor

I love the words on this sign, but I wanted to lettering bigger and a little brighter. I searched around Pinterest for a free font that struck my fancy, and found one called "Nashville", which I then downloaded to Word. 

Next, I pulled on my trust cowboy boots, and headed to our basement (yee haw!), where I searched for the perfect piece of wood, that would be the right length to hang above the coat closet. 

A length of scrap plywood fit the bill. It had a few dings and dents, but that's what I was looking for. 

I painted the plywood black and waited until it was good and dry.

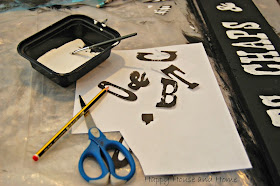
As I waited, I typed in the words BOOTS, CHAPS AND COWBOY HATS in the font "Nashville" and printed them off. I used the font size 200 to make the letters extra, extra large. I then cut out the letters and traced them onto the wood with pencil. (All of this because I stink at eyeballing letters).

hand painted sign, western decor

I then filled the letters with white paint. (I didn't have the right sized paint brush so I used on old make-up brush!) 

hand painted sign, western decor

Once the paint was dry, I sanded the whole piece down with some sand paper, and  then a little steel wool, to try and age it a little bit. 

hand painted sign, western decor

I used my favorite method to hang the sign ~ pop tops and hot glue. (See HERE for a little more detail) 

hand painted sign, western decor

And there you have it! Perfect for hanging above the coat closet! So far, I like a little Western! 

hand painted sign, western decor

Do you have any Western decor DIY's? Or are you a full-blown cowgirl or cowboy? 

I'd love hearing from you! I'd also love for you to follow along on FB, Pinterest, OR 

Don't forget to subscribe to my newsletter! (Above) 

If you would like to join in some fun link parties, head on over HERE

Monday, March 24, 2014

FUN Bathroom Sign (Wash Your Hands)

DIY sign, wash your hands sign, bathroom sign

I have teenagers.

One of my greatest joys is causing them to roll their eyes, and in fact, I consider it my job, as their mother.

My take on my role as a parent wasn't always this warped. When I became a mother I looked at motherhood through rose-colored glasses. I could picture myself ~ a role model to my children through the years ~ the woman the children saw as their brave and noble heroine. They would gather around me, hoping I would dispense warm hugs along with invaluable advice...

Yeh right. That lasted until they were 7. Now I simply settle for getting their attention on occasion.

But I try to rise to every challenge. I'll win their attention any way I can, and I've found the best way is usually through irritation.

Oh, the joys of motherhood!

One perfect example of this is the day I painstakingly made a canvas covered in Pitbull lyrics, and hung it on the wall ~ as a simple and effective reminder to my children of how their mother is old and out of touch. (here)

Similarly, this week I found a zombie "wash your hands" printable (here).  I immediately thought of ruffling my kids feathers, so I downloaded and printed it, on regular old printer paper. 

(Unless you're 13 to 15, there's nothing WRONG with this cute printable. It's funny and quirky. However, I just KNOW it will elicit dramatic eye rolling and sighing in my house. Aaaaand, my work will be done.)

So here it is: 

DIY sign, wash your hands sign, bathroom sign

Once printed, I cut off the white edge and taped it onto a piece of "zombie green" craft paper, which I then popped in an old frame and hung it in the kids bathroom. 

DIY sign, wash your hands sign, bathroom sign

Let the adoration begin.  

Oh, and by the way ~ the frame was old, and the little hanger had fallen off of the back. Not to worry!!! I (to further the torment of my kids) used a pop-top.


LIKE SO:

DIY sign, wash your hands sign, bathroom sign

DIY sign, wash your hands sign, bathroom sign

Just an easy fix in case you need to hang something and don't have the right supplies!

Do your teens worship you? Or, like me, on some days, are you just happy to be tolerated? 

Leave me a comment! I'd love for you to follow along on FB, Pinterest, OR 

Don't forget to subscribe to my newsletter! (Above) 

Also, if you would like to join in some fun link parties, head on over HERE

Thursday, March 20, 2014

Western Decor Love

western decor, cowboy decor

I have a big 10-gallon love for Western and Cowboy decor. Unfortunately, even though I live out in the country, being from Central New York, the closest I get to being a cowgirl is:

I have the above longhorns on the wall in my living room, 

I L.O.V.E. country music, 

My Mom lived in Texas, 

I have lots of cowboy boots, 

and, 

Once in a while, I like to eat at Longhorn Steakhouse! 

But just because I'm not a real cowgirl, nor married to a cowboy, that doesn't mean I can't add a few more elements of Western decor to my home. However, I think these elements have to be accents, rather than full blown cowboy themed rooms.

See? Like below? I love it, and I want to be curled up on that sofa ~ but that might be just scream "Ye-Haw" a little too much for my neck of the woods (or for Big A and my kids, for that matter).

Cowboy bedrooms decorate cowboy and indians theme stage coach theme

Therefore, I've been collecting ideas, and corralled (get it?) a few fabulous accents to give a little more Western or cowboy feel to my home. Anyone could easily mix and match many of these ideas with any decor, in any home. (Well perhaps not at, say, Buckingham Palace. I don't think the Queen has any room for cowhide.) 

But, assuming you aren't the Queen, here are a few ideas for living (a little) like a cowboy. 

The first candle holder is adorable. I have about 300 feet of barbed wire in an old stone wall that runs the length of our property. Until just this moment, I thought it would be a nuisance to pull it out. Now ~ I'm thinking home decor.  


The next candle holder would be so easy to replicate. I can't tell you how many belts and belt buckles there are in thrift stores (not to mention I have quite a collection in my own closet and could spare one or two). 

Western Candle Holders

Loving the cowhide runner. Again, pretty easy to replicate with a little thought. 

Cowhide and Turquoise Table Runner

Plus, all the cool kids are making faux cowhide rugs and lampshades ~ why not a runner?


Rain on a Tin Roof Cowhide Lamp Shade. I love this lampshade ~ this would work in any room, tucked in any corner or taking the spotlight. 

The fringe on this place mat is great - I've never thought to use cowboy fringe on anything, other than my black cowboy boots. But to put fringe on a place mat ~ adorable. I want to make a version of these right now! 

Laredo Chocolate Placemats - Set of 4

(Except where noted, the above awesomeness all came from the Lonestar Western Catalog. However, if I were a betting woman ~ which I would be if I was a cowgirl ~ I would bet that any of those could be made DIY style, with a little imagination. SOURCE)

Grab a shot of whiskey (or a Cosmo) and let's get on with the ideas!

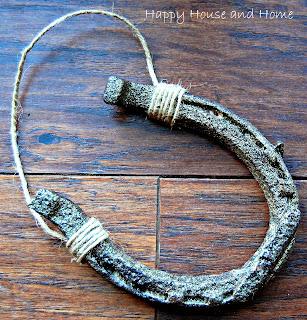
I found this horseshoe in the stone wall that I mentioned above, and hung it over my back door. Definitely brings us good luck. I grew up riding and love horses. Now I'm just loving horseshoes. 

How To Hang a Horseshoe 

horseshoe, horseshoe craft, hang a horseshoe, western decor, kitchen decor

Painting bar stools is easy peasy lemon squeezy. I can see a distressed paint with painted horseshoes and stars, in rustic colors.


The Sign. I want to make one. Wouldn't it be perfect for a boys bedroom?


(image source not available)

The wagon wheel makes me happy. Plus, if I had a real wagon wheel, it would always remind me of the song "Wagon Wheel"  (click link for the song and to be happy today).

I love it hung on the wall as below. I see this wheel even sports some twinkle lights... Swoon. (Note to self: keep eyes open for wagon wheels.)


Check out this wagon wheel made into a clock and used as a mantel decoration:

clock for the cabin out of a wagon wheel. @Bonnie Heyrend
(source unavailable)

I love it all.

Yup, I'm feeling certain some cowboy decor is in our near future. I just have to be on the look-out for a few supplies. In the meantime, here are a couple of cowboy craft supplies I found, in just a few minutes of searching.  (click the picture to go to the page)

Faux barbed wire ~ possibly a good buy, rather than trying to rip it out of the stone wall!


Cowboy decal ~ love this. 


Cowhide fabric is everywhere. And this faux fabric is great! Perfect for making pillow shams, lamp shades, table runners... ahhhhh.... 


A package of 10 horseshoes. I like 'em! Cheap and cheerful if you don't feel like searching in your stone wall for the real thing.


Do you like Western/Cowboy decor? Do you have any good ideas for me? Share 'em cowgirl!!!


Please don't forget to subscribe to my newsletter! (Above) 


Also, if you would like to join in some fun link parties, mosey on over HERE
Sunday, March 16, 2014

HOW-TO Clean a Shower Head

life hack, how to clean shower head, clean a shower head


I've started Spring Cleaning! 

Okay, perhaps that's a slight exaggeration ~ I cleaned one of the shower heads, in one of the bathrooms. C'mon, that totally COUNTS!!!

I hate cleaning, but THIS is more of a Life Hack. And I love life hacks. I love the term life hacks. :-)

Life hack refers to any productivity trick, shortcut, skill, or novelty method to increase productivity and efficiency, in all walks of life; in other words, anything that solves an everyday problem of a person in a clever or non-obvious way.
source 

OK, so let me set the scene and then I'll get on with it:  The kids bathroom has a shower head that is completely clogged up with minerals and deposits. The kids don't complain, but when I clean the bathroom, I've noticed that the some of the little holes don't spurt water, and the ones that do, aren't doing it very well.

So last week Big A and I were at Home Depot (on one of our many romantic afternoons). We were in the bathroom section looking at shower doors and Big A mentioned that he was going to buy a new shower head for the kids bathroom.

"Nooooo!" I screamed (with perhaps just a little too much drama). "I can clean it. I promise." To this, Big A rolls his eyes, and mumbles "whatever", and continues shopping, thinking he will have to come back to buy a new shower head. (He has no faith.)

But I did it, and the shower head is back to its like-new working order. Plus, I didn't even have to remove the shower head. Impressive, eh?

Here's how to clean a shower head and get the water flow back to it's original free flowing splendor.

1. Half-fill a baggie with CLR (link below if you don't know what this is). OR, to avoid chemicals, fill your baggie with plain white vinegar.

2. Use a twist tie to secure the baggie to the shower head, so that the end is submerged in the CLR or the vinegar.

3. Leave this on the shower head for 3 hours or overnight.

4. Remove the baggie and drain the contents. Give your shower head a wipe with a sponge, and run the warm water for a minute.

5. Enjoy a full day feeling Zestfully clean!


life hack, how to clean shower head, clean a shower head

I would love to know your favorite life hack? 


Please don't forget to subscribe to my newsletter! (Above) 

Also, if you would like to join in some fun link parties, click HERE

Saturday, March 15, 2014

A Twist on Corned Beef (with Hash Brown Cups)

Corned Beef Recipe, Corned Beef, Hash Brown Cups, St. Patrick's Day, St. Patrick's Day dinner

I feel guilty about this, but here goes nothin'. 

. . . I'm only a tiny bit Irish. 

I'm not fond of Corned Beef. 

And . . .  I don't drink green beer. 

However, to make up for my shortcomings, I make the traditional Corned Beef, Potatoes and Cabbage for St. Patrick's Day. (Even if I didn't want to, I think it's the law.)

Last year when I made St. Patrick's Day dinner, this Corned Beef came out delicious, so that's the menu for St. Patrick's Day this year.  I always say, stick with what you know! (No, I don't actually say that, but I like this recipe, so I'm sticking with it!)
Even if you like the traditional corned beef, this will make a nice change. It's really, really good. So good, I might consider making this twice a year! Plus, the Hash Brown Cups are fun and delicious. 

If you don't like corned beef (that would be me), trust me, you will probably like this one! Just give it a try! 

Here's the dealio: 

BBQ Corned Beef: 

Take a pre-packaged brisket corned beef and pop it in the crock-pot (as per the package directions), and add the spice pack. Mine took 6 hours on low. 

When the beef cooks the appropriate amount of time, drain it, and cover it in BBQ Sauce (Sweet Baby Rays), and wrap it in foil.

Then put the whole she-bang on a pre-heated medium grill for 1/2 hour. (OR, if it's not grilling weather, put it in a 400F oven for 1/2 hour)

*Note: use quite a bit of BBQ sauce, I used about 2 cups, and only put it on the grill for 1/2 hour - any longer and the BBQ sauce will dry out a little too much. I learned this important lesson last year. 

Slice and enjoy!

Before you put your beef on the grill, prepare your cute little Hash Brown Cups: 

Corned Beef Recipe, Corned Beef, Hash Brown Cups, St. Patrick's Day, St. Patrick's Day dinner


 Hash Brown Cups:

Mix one bag of frozen (20 oz) bag of hash browns with 2 eggs, 1 cup grated cheddar cheese, 2 tsp minced fresh garlic, and 1 tsp dried dill.

Spray a mini-muffin tin thoroughly with cooking spray, and fill each cup with the potato mixture and pack down lightly.

Bake at 350 for 45 mins to 1 hour until browned and crispy.

I have coleslaw to serve with this ~ because you may have guessed, I don't like plain boiled cabbage. 

The original recipes can be found at:  Palmabella's Passions and Delectameals 

What are you doing for St. Patrick's Day? 

Please don't forget to subscribe to my newsletter! (Above) 

Also, if you would like to join in some fun link parties, click HERE


Thursday, March 13, 2014

Taco Muffins

Taco recipe, taco muffins, kid-friendly recipes, kid recipes

Up until this year I managed to successfully avoid Taco Bell. In fact, I was trying to go my whole life. 

I love Tacos, but I couldn't get my head around the Taco Bell rumors. I get a little turned off by the thought of human digits, horse meat, and my personal favorite: enema juice.

However. 

Despite the rumors. Despite my firm belief that you do not spit in the wind. I broke down and had a beef taco. 
Mistake.

Don't get me wrong, I'm not in any way being critical of fast food ~ but I'll stick to making my own tacos. And when the fast food mood strikes, happily eat a Big Mac!

Lucky for me, Tacos are easy to make. I love Tacos. Taco Dip. Taco salad. Taco Casserole. AND these little tacos made in a muffin tin. My kids love them too, and they make a great appetizer, or fun dinner in front of a good movie.

Taco Muffins
  • 2 pie crust, unbaked
  • 2 lbs ground beef
  • 1 packet taco seasoning (I use spicy) 
  • 1/4 cup water
  • 1/2 cup queso dip
  • 1 1/2 cups cheddar cheese, grated/shredded 
  • 1/2 cup salsa
  • 1/2 cup sour cream
  • Green onions, for garnish
Pre-heat oven to 400 degrees F. 


Brown ground beef in a skillet, and drain the excess fat.  Stir in taco seasoning and water.  Simmer for 10 minutes. 
Taco recipe, taco muffins, kid-friendly recipes, kid recipes

Roll out pie crust to about 1/8  inch thickness and cut into 3 inch circles; my crusts made about 18 circles. 
Press each circle into the bottom of each muffin tin, and prick bottoms with a fork.
Taco recipe, taco muffins, kid-friendly recipes, kid recipes
Bake at 400 degrees for 15 minutes, or until lightly browned.  
Fill each muffin with about 1/4 cup of ground beef, a teaspoon or two of queso, and sprinkle each generously with cheddar cheese.  
Bake for an additional 5-10 minutes or until the cheese has melted.  
Taco recipe, taco muffins, kid-friendly recipes, kid recipes
Serve with sour cream, salsa and green onions.  
Taco recipe, taco muffins, kid-friendly recipes, kid recipes


My kids don't like anything extra in their little tacos. But feel free to add chopped black olives, jalapenos, guacamole, corn, re-fried beans, etc.! 


TIP FOR REGULAR TACOS: 

Once done preparing your taco meat, preheat oven to 400. Take your hard taco shells and stand them up in a line, in a Pyrex 9x13 dish. Fill with taco meat and cheese and bake for 10 minutes.

This softens up the shell, so that when you bite into it, it doesn't explode all over your plate! 


HEY! Please don't forget to subscribe to my newsletter! (Above) 

Also, if you would like to join in some fun link parties, click HERE


Thursday, March 6, 2014

Banana Bread with Streusel Topping


If there's a food you want, just mention it near me. I mean, you could just whisper it in the same room as me, and, you'll get it. Where food is concerned, I have what's commonly known as "power of suggestion-itis".

For example, last week Big A called me from work and told me he wanted lobster. I laughed. Hahaha! And then the "power of suggestion-itis" began: "Oh, right, lobster on a weeknight! Who would think of such a thing? Wait, lobster does sound good. Really good. MUST. HAVE. LOBSTER." Three hours later, I'm walking out of Wegman's with two Lobsters, and a pound of butter!

Similarly, this morning I was cutting up a banana for my daughters smoothie. My husband jokingly said, "Oooh, you makin' banana bread?".  That's it, banana bread on the brain. Three hours later, and banana bread is going into the oven.

It's kind of a curse for me, because it means extra work involved in my day. (Not to mention, there are usually several hundred calories involved!)

But today ~ damned if that bread isn't super good!  So, good, I had to share the recipe.

The recipe for the bread itself is so easy. But if you want to go the extra mile, make the streusel topping. It gets all crispy on the top of the bread, but some of it sinks into the bread and is all sugary and buttery. Worth it.

Banana Bread with Streusel Topping


Ingredients:


    • 1/2 cup butter
    • 1 cup sugar
    • 2 eggs, beaten
    • 4 bananas, mashed
    • 1 1/2 cups flour
    • 1 teaspoon baking soda (or 2 tsp baking powder) 
    • 1/2 teaspoon salt
    • 1/2 teaspoon vanilla

    • For Streusal Topping: 

      • 1/3 cup oats (I used quick-oats) 
      • 1/3 cup brown sugar
      • 2 tablespoons butter

Directions for the bread: 


  1. Cream together butter and sugar. Use beaters. 
  2. Add eggs and mashed bananas.
  3. Combine well. I used beaters for this. 
  4. Sift together flour, soda and salt. Add to creamed mixture.  Combine well.
  5. Add vanilla. Mix well. 
  6. Pour into greased and floured loaf pan. (I used butter flavored Crisco to grease the pan)

    For Streusal: 
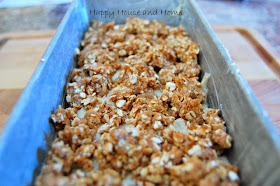
  7. Mix oats, brown sugar and butter for the streusal topping. I just mix this with a fork. 
  8. Sprinkle on top of unbaked bread mix. 
banana bread, streusel topping

9. Bake at 350 degrees for 50 minutes

Use a toothpick and check that when it is inserted in the middle of the bread it comes out clean.

When the bread is cool, you can keep the banana bread in the fridge. Delicious toasted in the toaster oven. 
See how the streusel is in the middle of the bread AND on top! It's sooo delicious! 


I hope you'll try this. Let me see if YOU have "power of suggestion-itis". 

Banana Bread...

Banana Bread...

Banana Bread...

HEY! Please don't forget to subscribe to my newsletter! (Above) 

Also, if you would like to join in some fun link parties, click HERE

Tuesday, March 4, 2014

How To Make a Spring Wreath

It's time to make a Spring Wreath! The sun is shining, the birds are chirping... SPRING! 

Spring wreath, DIY wreath, Burlap Crafts, Burlap wreath, DIY burlap wreath

Okay, so that might be a slight exaggeration. It actually looks like this outside my front door:


And it's 0 degrees F. 

I'm so sick of winter, I could run screaming into the snowbank. In fact, I considered it. Then I realized that action might land me in a rubber cell ~ so I thought I'd forgo the snowbank, and move forward like a sane person, as if Spring has Sprung. 

I talked myself down off the proverbial snowbank... "The clocks are moving ahead, it's MARCH, Easter is right around the corner... Things aren't too bad!"

So as cooler heads prevailed, in my first effort to Spring Forward with the clocks, I grabbed a chocolate chip cookie and a cup of coffee, and made this easy wreath using:
  • Grapevine wreath
  • Strand of silk flowers 
  • Burlap Flowers (hand made) 
  • Burlap
  • Hot Glue
  • Pizza Box Lid
  • Twine
  • Acrylic Craft Paint
First, I attached the flowers to one side of the wreath, using a little hot glue. My favorite color is yellow, so that's the only reason I chose these flowers. In other words, I don't know if they're particularly Spring-like flowers, but you could use any flower you like.

Spring wreath, DIY wreath, Burlap Crafts, Burlap wreath, DIY burlap wreath

Spring wreath, DIY wreath, Burlap Crafts, Burlap wreath, DIY burlap wreath

Next, I wrapped a little burlap around the grapevine, on the opposite side of the yellow flowers. I did this because I wanted to make a letter to attach to that side, and wanted to make sure it would stay secure.

Spring wreath, DIY wreath, Burlap Crafts, Burlap wreath, DIY burlap wreath

I attempted to make some burlap "flowers" following the tutorial from Craftaholics Anonymous (Tutorial HERE). Yes, hers look waaaay better than mine! 

Spring wreath, DIY wreath, Burlap Crafts, Burlap wreath, DIY burlap wreath

To make the letter "K" (which stands for Kick winter the H. E. double toothpicks out of here), I used the cardboard from the lid of a pizza box. Oh yuh, classy as usual!

I painted the "K" black with craft paint and outlined it with a little twine. Of course, to save yourself this time, you could just buy a letter from a craft store for 99 cents!

Once I attached the K ~ voila! Spring!

Spring wreath, DIY wreath, Burlap Crafts, Burlap wreath, DIY burlap wreath

I hung this on my front door, which is covered by the front porch, so I don't have to worry about rain (or snow) ruining the "K".

Now that it's up, I feel better already!

In the words of Phil Roberston:

Happy
Happy
Happy

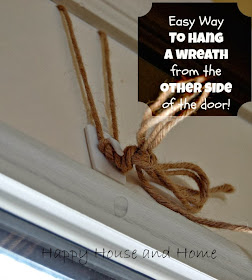
Oh, and just in case you don't use this method, or haven't thought about it... this is how I hang a wreath. Of course, you can see the little bit of twine on the inside of the door, but it looks Really Good from the outside!

Spring wreath, DIY wreath, Burlap Crafts, Burlap wreath, DIY burlap wreath

So tell me what you're doing to Springify at your house? Even if there's still snow on the ground?

HEY! Please don't forget to subscribe to my newsletter! (Above) 

Also, if you would like to join in some fun link parties, click HERE