Pages

Saturday, December 28, 2013

Buck Head Wall Art


DIY wall art, wall art, silhouette, animal head silhouette

I covet animal busts. But with price tags for the real kind in the hundreds of dollars, I realize
I'm not going to get one any time soon.
However, I recently read a post by one of my favorite bloggers, Amy at Buffalo Roam HERE. She printed out animal silhouettes, and painted them on cork board for her little guys room. Brilliant idea!

Amy's idea gave me a plan for using a silhouette of an animal head in my home. Not to mention, this was such an easy and fun project, I just wanted to do it!

The Buck Head is free to print out HERE. Or, if you're looking for different silhouettes,
just look for free graphics on Pinterest or Google. There are TONS.
I liked this buck silhouette that Amy linked, so, I printed it out.  I wanted a larger silhouette, but my printer wouldn't allow me to print a larger copy over several pages, so I took the small print and had it blown up at Staples. (The cost was .18 cents!).

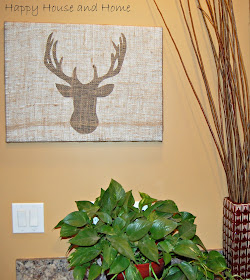
I then cut it out, and traced it on a large (24" x 18") canvas.


Easy.


And super fun.


I filled in the traced head with black acrylic paint. I toyed with the idea of making him sparkly, but I'm trying to cut down on glitter...

(Painting is not shown - but in my defense - I got side-tracked because
I brewed pot of coffee, but forgot the coffee. Aaaaargh!)

While waiting for the paint to dry, I sulked a little about the coffee.  Meanwhile, I had the idea to cover the whole canvas with burlap. I checked with Big A, who can be somewhat suspicious of my (sometimes) impulsive ideas, and he actually liked this one! Woot woot!

To keep the burlap in place, I used the staple gun, and stapled the burlap in just four places. I then used hot glue on the back side of the canvas, and glued it all around.

At this point, because I was caffeine deficient, I thought it would be a good idea to use my bare fingers to press the burlap into the hot glue! Umm OW. (I suggest you skip this step, and use something besides your fingers - like an old knife.)

Anyway, it all worked out in the end!

I got a cool new deer head to hang on my wall.
Big A made me another pot of coffee, with coffee in it.
And, my fingers, well, they'll heal.


To hang, I broke a soda tab off of and empty soda and glued it to the center top of the back of the frame.  (Like THIS, only I used glue to attach it to the frame). The canvas is so light you could just use a finishing nail to hang it.


Notes:
  •  I notice that there is a strip of the burlap across the deer nose that looks a little darker, or more dense. It's less noticeable in real life, but, I may have to re-do the burlap if my OCD takes over.
  • I loved this so much I made one for my sister.
  • There is some debate over whether this is a buck or a moose. The free graphic said it was a deer, but my kids say moose. What do you think?

Friday, December 20, 2013

Two Layer Pumpkin Cheesecake Pie

 Two Layer Pumpkin Cheesecake Pie

pumpkin pie, two layer pumpkin pie, holiday pie recipe


This two layer pumpkin pie is delicious!  I was craving a pumpkin cheesecake, but I wanted to keep it in a pastry crust, like a pumpkin pie.  So, I decided to combine the best of both worlds, and make a pumpkin pie with a cheesecake layer!  This is perfect for the holidays, and easy to make.

NOTE: To make the pie over-the-top good, don't forget to serve with whipped cream!

Serves 8 to 10

Ingredients:

  • 1 9-inch (store bought) pastry pie shell, unbaked

    For the cheesecake layer:
  • 8 ounces cream cheese, room temperature
  • 1/4 cup sugar
  • 1/2 teaspoon vanilla extract
  • 1 egg

    For the pumpkin layer:
  • 1 1/4 cups pumpkin puree (plain - not the pie mix)
  • 1/2 cup sugar
  • pinch of salt
  • 1 teaspoon ground cinnamon
  • 1/4 teaspoon ground ginger
  • 1/4 teaspoon ground nutmeg
  • 2 eggs, slightly beaten
  • 1 cup evaporated milk

Directions:

Pre-heat oven to 350°.
 
In a mixing bowl, use beater to combine cream cheese, egg, 1/4 cup sugar, and vanilla extract, and beat until light and fluffy.
 
Use the back of a spoon to spread the mixture into the unbaked pastry shell.
 
In a separate bowl, combine the pumpkin puree, 1/2 cup sugar, salt, cinnamon, ginger and nutmeg. Beat in the 2 beaten eggs and the evaporated milk.
 
Pour pumpkin mixture over cream cheese layer. Spread until it is even (if you have to).
 
Bake pumpkin pie at 350° for about 60 minutes, or until set. (After about 20 minutes I had to cover the edge of the pie crust with tin foil so that it wouldn't get too brown.)
 
Cool pumpkin pie thoroughly. Serve with whipped cream or cool whip.

(Like the fancy stars and spotlight focus thingy I used on my photos? Well. I had to, because the only picture I took of the pie was with my iPhone, in a dim room, on a cluttered table... oopsie!)

holiday recipes, two layer pumpkin pie, pumpkin pie, pumpkin cheesecake

So what kind of pie are you having for the holidays? What's your favorite? I really like this cheesecake base, and might try replacing the pumpkin with cherry pie filling on the top next... Cherry Pie is my favorite! :)

Wednesday, December 18, 2013

Sheet Music Tree

crafts using sheet music, sheet music decorations, sheet music
 
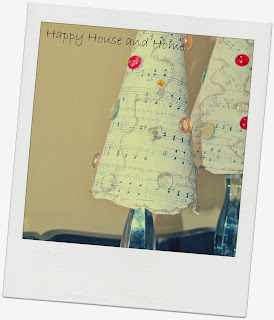
A quick little tutorial to make a sheet music tree!
 
Take two old candle sticks, with candles.
 
 
Go to  here or here to print of sheet music for free.


Roll the paper into a cone and tape into place.
 
 
Use two pieces of sheet music, and cut the edges to make it into a tree shape.
 
Gather your supplies - glue gun, glitter, glass beads, anything you have on hand...


Go to town and decorate your little music sheet trees.
 
And then pop them on top of the candle/candle sticks.
 
 
Have fun playing with PicMonkey.
 
 
Easy, fun, and free.
 

Monday, December 16, 2013

(DOH) Christmas Tree, (DOH) Christmas Tree


I'm a little behind in decorating for Christmas. Three weeks ago, I WAS ahead. So far ahead, my family made fun of me. By Thanksgiving I had some garlands up, we had the tree, we'd made an outdoor tree for the front yard. We were moving right along - full steam ahead.
 
(Insert screeching brake noise here. Flu.)
 
Right before I got sick, we brought the tree in, and popped it in the tree stand. This is when we realized the tree was not quite as perfect as it looked in the field. (DOH!) In fact, it was the opposite of perfect. It looked like the entire trunk was crooked. So with some team work, Big A and I managed to tilt the tree just so, and it looked straight.
 
Then we noticed, the one little gap we'd seen in the field, turned into three large gaps, and the one crooked branch turned into seven crooked branches.
 
"Nothing we can do about that now" we said. And so, We Let The Kids Decorate The Tree. (This is important to remember.)
 
We tried to use ornaments to fill in the gaps. We turned a blind eye to the crooked branches.
 
We stood back, with the ornaments hung, and ... realized that despite our tilting the tree just so, we not only had a crooked trunk, our straight alignment, turned out to be not even close the straight.
 
Big A had to lift the tree out of the stand, (with 2/3 of the lights on it, and all of the ornaments), and re-align it. That went well. And by "well", I mean - every swear word I know was muttered by Big A.
 
Let me mention at this time, our bulbs are made of glass. As it turns out, very thin glass. (Big A may have begged me to buy plastic rather than glass bulbs. I may have insisted on glass.)
 
So, as you can imagine this whole Christmas decorating thing has not been going quite as planned.
 
I needed remind myself - when times get tough, the tough...
 
Laugh at others!
 
C'mon! I'm not that bad! Sometimes I feel better about myself my tree, when I can laugh at others (trees).

If you need to feel a little better too, here are a few trees, that make me feel better about my tree.
 
This tree makes me smile! A Londoner put this guy up. He makes my tree look happy. And that makes me happy!
Unloved: Artist Dean Stockton gave London's discarded Christmas trees their own personalities
SOURCE

Look at this one. Comparatively, my tree looks positively LUSH. Yay for my tree!
Cheap Christmas Tree 2


This image from Pinterest truly makes me feel better:
Charlie brown Christmas tree!
Yeah, that's sad. :-( for that tree and :-) for my tree.

And look - this lil tree makes my tree look rod straight:
My who-ville/charlie brown christmas tree

See? Now I feel better! After all, maybe our tree will be just fine with a little love.

Custom order on Etsy, $10.00. For a customers Charlie Brown Christmas tree.
(To order this adorable sign, go to: source)


Now my tree just doesn't look so shabby to me. How about you? How's your tree? How's your decorating coming along?

(NOTE: Sources for the images are noted, otherwise, they are images from Google and Pinterest, and didn't have a source listed. Please also note that I'm not really making fun of any of the above trees. They're all adorable in their own way!)


Saturday, December 14, 2013

Getting Ready for Santa


christmas decor, christmas lights, decorating for christmas
 

Good Morning! Sitting across from my kitchen window feels a little festive now. As you may know, I had a set back in the Christmas decorating department, and I'm trying to play catch-up now.

Yesterday my kitchen window started out like this. (photo from earlier in the year, but you get the idea...)

christmas decor, decorating ideas for christmas
 
I love my little kitchen window. I spend quite a bit time here - with three kids at home I wash a lot of dishes! Plus when I'm on the computer, sitting at the island, it has the perfect view of the woods, where I keep an eye out for deer, turkey, and Big Foot.
 
Since I'm feeling better, I decided it was categorically time to say goodbye to autumn, and get ready for Christmas. It is 8 degrees F outside, so rather than actually go out, I went straight to my basement and went shopping. I was hopeful, but... nothing.
 
So I headed to my next favorite place to rummage - the dining room hutch. Score!  


When you're 46 36, you have a lot of things hanging around that you might have forgotten about put away for a special occasion. (It's a true fact that I rarely have to go out of my own home to shop.)

These brass candlesticks have never been put out. Mainly because they're boring. And all they needed? A little glitter. In this instance, a thin coat of gold glitter with a light spray of silver glitter.

A quick spray with my new fave - Rustoleum Glitter Spray Paint , and they looked a lot more like Christmas:

 
I hung up some fairy lights, and a little bead and ribbon garland, and this is what my kitchen window looks like in the (very early) morning: 


 And at night:

 
Little by little... And by Christmas Eve I hope the house will be glowing in time for Santa!

Next up is the tree.

(A not to those of you know my obsession - I promise, no more about glitter. I swear!)

Thursday, December 12, 2013

An Affair to Remember

Sometimes in life we do things we regret. I know I do. But it's okay, as long as we learn from our mistakes. In the past couple of weeks, I've learned a lesson. 

You see, Big A has been working very long hours, and I've been six ways to Sunday.  I felt sorry for myself, and then, it just happened. I love my husband, but I found myself keeping company with Mr. Influenza. In the beginning, it seemed like it would be fun - a couple of days cuddling on the sofa, some R&R, drinking tea...

But it wasn't fun. Mr. I (as I like to call him) was not fun. He was mean. I had to put on my big-girl boots and say "No more! You get out offa my sofa!"  You see, I realized that Big A is much nicer than Mr. I. And way more fun to cuddle with.

Having learned this valuable lesson, I feel I'm back to my old self now.

Due to that little bump in the road, the problem is that we now have less than 2 weeks until Christmas, and I seem to live in the house where time stood still.

The tree is up. But only some of the lights are on it. (No joke - the lights are missing from the entire 1/3 bottom of the tree).

Icicles hang from the roof line of our house, but nothing else does.

The presents are hidden in the basement, but nothing is wrapped.

You get the idea.

I did, however, find a little something I wanted to share. If you find yourself in a similar situation, and you need a little Christmas décor help - this spray paint is awesome!

christmas decor, spray paint, glitter


It gives anything a pretty festive glow - and paint the heck out of anything in your way!

It goes on very light and leaves behind a sparkly, shiny finish.  


(If you click on the picture you can see how pretty it looks! In this instance, I sprayed an old grapevine wreath. In fact, I sprayed 3 of them. They're so sparkly but still natural looking.)
 
In general, I'm actually loving the natural look of things around here. I'm almost glad I took up with Mr. I, and was forced to keep it simple. Almost.
 
In the meantime, I'm getting this in silver too, and inviting Christmas in!


(This isn't a paid post, I just love this stuff!) What have you found lately that makes your décor festive?