Hello there! It's been a crazy couple of weeks around here! Not only did we have 3 birthdays and 3 graduations, but my step-daughter, and now son-in-law got married on Saturday.
It's been a crazy fun happy whirlwind!
But, now things should settle down a little bit, and I can get a little more done around here.
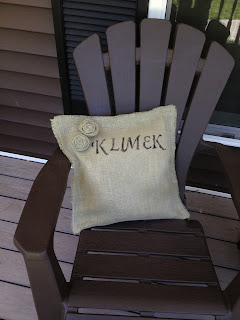
I wanted to show you another no-sew pillow I made which I've been using on the front porch, and in the kitchen. I even managed to make rosettes to decorate it. (I've got hot glue burns on my thumbs, but that's par for the course I suppose. DIY is a dangerous business.)
Do you have an old pillow you'd like to cover? I took an old pillow that needed to be covered and just measured how much burlap I would need, and cut it to size.
To make a clean line when you cut the burlap, you grab a little strand, like below, and pull it right out, leaving you with a clean, straight line to cut.
You can see that line right?

Next I just placed the pillow in between the two pieces, and glue gunned the burlap on the inside edges. I made sure to leave about half an inch all around so that I could "fray" the edges.
Once the pillow was in it's burlap envelope, I decided to make some rosettes. I am going to give you a tutorial I followed, rather than try to explain it here. Take a few minutes just playing with the strip of burlap before you start gluing. Once it "clicks", you will be a rosette making expert.
Once they were done, I glued them onto the pillow.
I then stenciled our last name on the pillow, for a little extra detail.
I'm happy with the pillow. The burlap is a little messy, so I wouldn't lean on it if I was wearing a black sweater, but it looks cute! Plus it cost me nothing to make, as I had the burlap, glue and old pillow! Yessss!
So what have you been up to this past week?
Please follow me, and join me at these great parties!
SUNDAY
That DIY Party at DIY Showoff
It's Party Time at Three Mango Seeds
The Sunday Showcase Party at Under the Table and Dreaming
Sunny Simple Sundays Party at Sunny Simple LifeIt's Party Time at Three Mango Seeds
The Sunday Showcase Party at Under the Table and Dreaming
Sundae Scoop at I Heart Naptime
Think Pink Sundays at Flamingo Toes
Nifty Thrifty Sunday at Nifty Thrifty Things
Restyled Sundays at Stylish Once Again
Silver Pennies Sundays at Silver Pennies
Frugal Crafty Home Blog Hop at A Blossoming Life
MONDAY
Before and After at Thrifty Decor Chick (first Monday of the month)
TUESDAY
The Weekly Creative at Reasons to Skip the Housework
The DIYers at Home Coming
One Project at a Time at A Bowl Full of Lemons
WEDNESDAY
Fluster's Creative Muster at Fluster Buster
Rock N Share at The Shady Porch
Wordless Wednesday at Blog She
Wildly Original Link Party at I Gotta Create
What I Learned Wednesday
Trendy Treehouse Wednesday Whatsits
Wicked Awesome Wednesday
Two Girls and a Party
Trendy Treehouse Wednesday Whatsits
Wicked Awesome Wednesday
Two Girls and a Party
THURSDAY
FRIDAY
SATURDAY


LOVE that! What a great/easy idea! You, my friend, are a genius. :)
ReplyDeleteThanks Amy! There's no genius involved, just laziness essentially - I hate sewing! :-)
ReplyDeleteJulia
Love your pillow...so fun and clever! Thanks so much for sharing at The Scoop!...hugs...Debbie
ReplyDeleteWonderful pillow!! I love the burlap flowers!
ReplyDeleteReally cute and I love the burlap roses!
ReplyDeleteVery cute and easy. Burlap can be a pain to sew, so this works great! Thanks for sharing at Restyled Sundays.
ReplyDeleteYou did such a great job with this pillow! I love the flower accents you made for it! Great job! Krista @ http://ahandfulofeverything.blogspot.com/
ReplyDeleteSuper cute! Love fun and easy projects like this. Thanks for sharing with SYC.
ReplyDeletehugs,
Jann
Thank you all for stopping by and checking out my pillows! I can't sew to save my life, so I'm pretty happy with them! Julia
ReplyDeleteGreat job! I cannot make those roses, have tried several times! Thank you for joining Home Sweet Home!
ReplyDeleteSherry
So pretty! Thanks for sharing at Silver Pennies Sundays. x
ReplyDeleteLove your no-sew burlap pillow. It turned out great!
ReplyDeleteThank you Jennifer and Danielle!
ReplyDeleteSherry - I don't know how I managed - this type of thing usually stumps me, but I guess the stars were aligned! Julia