Pages

Friday, May 31, 2013

Vanilla Ice Cream with Olive Oil (Trust Me)

Okay, if you haven't heard of this, and it sounds odd, then this is one of those things you're gonna have to trust me on.

Gelato Con Olio E Sale (Ice Cream With Olive Oil & Sea Salt)


The source for this recipe is Jamie Oliver. The link for the photo goes right to me at food.com.
"A la Carte" was the name of my catering company, and my profile on food.com. The photo was taken by GaylaJ on food.com.  

Back when I posted this recipe on Food.com, in 2007, I was a caterer, and was cooking all kinds of dishes, and open to all kinds of foods. I had been given a Jamie Oliver cookbook with this recipe in it. I hadn't tried olive oil on vanilla ice cream, but fully intended to. Once I did try it, that was it.  That summer, I swear I had this every single night for a week.

But over the years I kinda forgot about this delicious concoction. You see, I'd left catering when the kids got older because I just couldn't work the late nights and weekends. I became a cooking slave to my little darlings who insisted on hot dogs, mac 'n cheese, and deserts such as bubble-gum ice cream, and rocket pops.

But lately I've been missing some of the foods I used to cook, and have been going through all of my old favorites. In my binder, among the Thai and Indian recipes, was a copy of the recipe for
Gelato Con Olio E Sale (Ice Cream With Olive Oil & Sea Salt), and I was so happy for the reminder!

Lucky for my taste buds, yesterday it was almost 90, and today is the same.

SO, what's a girl to do? 

The obvious answer. Eat Ice Cream.

Now, please, please, please (pretty please) try this. It's so good. And, as I said all those years ago when I was about to try it, "If I don't like it, what am I out? A bowl of vanilla ice cream?"

Ingredients:
    • 2 scoops good vanilla ice cream (I use the slow churned, because although it's lower in calories and fat, it's super creamy and rich tasting)
    • 2 TBSP extra virgin olive oil (Jamie says use grassy olive oil - well, I just have a decent Spanish Extra Virgin Olive Oil)
    • A pinch Course Sea Salt

Directions:
  1. Put a couple of scoops of good quality vanilla ice cream in to a bowl. Drizzle with some very good extra virgin olive oil, and sprinkle with a pinch of sea salt on top.
 
So what do you say? Do you trust me? Will you try it, pretty please?!

Tuesday, May 28, 2013

Painting with a Soda Bottle

Hello there! I hope you all had a great Memorial Day! We had a great weekend - got some planting done, hung out with family. We had a couple of nice days, but a little rain too.

I was horrified that it might rain on my proverbial parade. Every Spring I do the same thing. I'm shocked and surprised when there's a rainy day. It's as if I have seasonal amnesia. What? It's raining? Why is it raining?

(I also have allergy amnesia - Why is my nose running? Why do I have a headache? Am I sick?)

Yeah. I know. It's Spring. Spring means rain. Rain means a forced break from the yard work. Therefore, with the clouds forming, and my nose running, I came up with something to do inside that I thought I'd share with you. 

(Sorry about the pictures, I didn't have my camera and had to use my phone.)

Here it is:


Years ago, my grandfather made a frame to hold a cork board. He had it hanging in their cottage on the lake, pinned with photos of the family.  The original Pinterest.
 
He passed away years ago, and I've wanted to do something with the frame for EVER. It's kinda cool and chunky looking. I just couldn't decide on anything special enough to use it for. At one point I painted the cork part yellow, but nothing else really came to me.
 
Meanwhile I'd seen this idea on Pinterest and thought I could make something similar...


Because I was forced indoors, I decided to do someting for the frame, rather than wait for a better idea to come along.
 
So I cut out a square of burlap. (You know how to get a straight line when you cut burlap? You pull one the strings of burlap where you want your cut to be. The material will scrunch up, and when the string is pulled out, it leaves a perfectly straight line that you can then cut along.)
 
I then just pulled some of the strings along the edge to make a fray, like so:


Using the glue gun, I glued the square of burlap onto the cork board.
 
I drew a branch, while my two teenagers laughed at me for using my lil guy's paint brush. (You can see it below - the kind that comes with a coloring book.)

 
For the flowers, I used an empty soda bottle - right up off of my elder son's bedroom floor.
Yeah, we're classy.
 
Just dip and press.


 And there you have it. Wall art from an old frame, a kids paint brush, and an empty soda bottle.


I like it. And I'm happy I'm able to use my grandfather's frame. 

Want to PARTY???

 Party Time at The 36th Avenue
 

Sunday, May 26, 2013

Me: 1 Weeds: 0

I removed a dead snake, dodged several (live) large spiders, and unearthed hundreds of worms. There's still dirt under my nails, and my jeans are ruined. If I were a 12 year old boy, I'd be in heaven. 


However, I'm not a boy or 12 years old. And, I'm not a happy gardener. I love the garden when it's all pretty and finished, but I complain and whine through the process of getting there. That being said, the storms finally subsided, and I managed to finish weeding and mulching my foundation garden - I'm DONE! But because I dislike gardening, I make sure I don't have to do it twice in one summer. Once is truly enough.

Weeding and mulching are the answer to a hassle-free garden for an entire summer. The mulch conserves moisture in the soil, which means you ultimately water less. It keeps down weeds, by eliminating sun light to the soil, and keeps the soil cool for your plant roots. PLUS, it makes your yard prettier in general. Mulching around trees simplifies mowing - and it keeps string trimmers (that's so formal, let's say "weed whackers"!) and lawn mowers away from tree trunks. This makes my husband, Big A, happy.

The first step with the garden is to weed. Weeding is my Room 101. As you may have guessed, I'm not into worms, spiders, or rotten leaves. I'm not very fond of getting dirty. But weeding each year is a necessary evil. I don't have any tips or tricks for weeding - it takes a lot of back breaking effort, plus a lot of time, and you get super dirty. Sorry.

Here's how to weed (a tutorial):
PULL. OUT. EVERY. SINGLE. WEED. BY. THE. ROOT.

When you have a 5 year old to entertain while you weed, take heed: If you give him the hose to play with, he will soak the garden, and you will not only be weeding, you will be weeding on a mud slick.

Assuming you survive the weeding, the next step is to prevent future weeds. Spread your plant-free areas with newspaper, about 4 sheets thick. If it's windy, as you lay the paper down, wet it with the hose, or get some more exercise chasing it around the yard.

Once the newspaper is down it's time to mulch. The chart shows how much you will need.

            How much garden soil or mulch do I need?
 
Mulches should be applied at a 3" depth. Therefore, six 1 cubic foot bags will cover 24 square feet. This may be a little confusing, so, just ask at the store. I ended up needing 30 bags of mulch for my garden. You can do that math if you wish  - I prefer to save what little brain activity I have for trying not to get hurt while handling tools and such.
 
(Chart courtesy of Home Depot)

Once I had the mulch that I needed, I laid each bag along the edge of the garden, where I thought I would need it. (Just to save hauling it bag by bag from the truck while I was spreading.)

Spreading the mulch is easy. Just pour each bag where you think you're going to need it. Spread with the back side of the garden rake (not with the tines). Once it is spread out fairly well, it's easiest to finish spreading it up to the plants with your hands. Don't get the mulch near the base of the plant, leave a little room.


Now a couple of notes:

  • Putting untreated mulch up against your home’s foundation can lead to termite infestation. They are nasty. Make sure the untreated mulch is at least 12" away from your foundation. (We bought the treated mulch).

  • Don't pile mulch right up to tree trunks or plant bases.The mulch holds moisture against the trunk, and that makes a breeding ground for fungus (or is it fungi?), which can eat right through the bark and cause the tree to die. Mulch should never be closer than six inches to a trunk.

  • Mulch will last a summer or two, but isn't a permanent solution. All mulched areas should be renewed every couple of years by raking out the old material, re-spreading it thinly, and then covering it with fresh mulch.


With the garden done for this summer, I am so relieved. Now I can go back to painting things, and planting in containers! Phew!

PARTY TIME:


Friday, May 24, 2013

Sometimes You Gotta Do What You Gotta Do...

Some days, even with the best intentions, loads of ambition (and lots of caffeine), Mother Nature has other ideas for what I'm going to do with my day.

This week I've been working on my front porch, and on my foundation garden.  I've been painting pots and furniture. I've been planting and weeding, and mulching. My back is sore and my nails are all broken, but it's all in a weeks work. Finally, today being Friday, this was the day the porch and the garden were all gonna come together. My hubby, Big A is home, the kids are at school, and we were gonna tie it all together.

And then we had storms. Severe thunderstorms with hail and wicked winds. We woke up this morning and it's 42 F, windy and rainy, and there's a giant tree down in our yard. So, what's Plan B you ask?

Well, I thought, have the following items out on my kitchen island:

scissors, glue gun, ribbon, pliers, hammer, 18x24 canvas, paint, glass beads, a wall decal... Perhaps I could make something, and then I came up with a plan, in fact, the perfect Plan B.

Here it is:

I'm gonna look out the window at my hunky hubby wielding a chainsaw, while I put the on the fire, cuddle on the sofa with my cat, and wait til the kids get home. That's not a bad start to the Memorial Day weekend. And, after all, tomorrow is another day!

Wednesday, May 22, 2013

Why Didn't I Think of That?

At least once a day, I think "why didn't I think of that?" to myself. This morning I was looking for a tip on pulling weeds (more on that later), and I thought I'd make a list of my favorite clever DIY tips and tricks, from our friends in blogland, or Pinterest, with a few tips and tricks I've learned along the way.

If you think of any cool tips or tricks you use in your home, feel  free to jump in and leave me a comment! That said, here's my list I made while sulking and procrastinating getting psyched-up about weeding:
Foam Soap Refill. Photo by gailanng


Make your own foaming hand soap and save $. Just mix 3 tbsp. liquid hand soap with 2/3 cup warm water and stir (don't shake) to mix. Obviously, you do have to use the foaming hand dispenser and not the regular kind.

(photo/recipe here)

Speaking of soap - who hasn't heard of the Dawn/Vinegar miracle? Probably you all have, but it bears repeating! Heat 1 cup of vinegar for 1 minute in the micro, and mix with 1 cup of Dawn. Particularly amazing at cleaning showers and tubs.  PLUS, spritz some on laundry stains - let sit for a few minutes, and the stain will wash right out.


And similarly, did you know baby wipes are awesome for cleaning leather shoes? Dingy white leather sneakers get a new lease on life with baby wipes.


Dryer sheets have about a billion different uses, but my favorite is to give the dog a rub down when she's been out in the rain - no more stinky doggie. Plus, the dryer sheet gets rid of the static electricity and can help the pup with anxiety during thunderstorms. (We have a big dog, don't know if I'd do this on a little guy, but you could check it out.)

Using tools? Here's a tip - flat thumbs are not sexy. Use a comb to hold a nail and save your digits.


OR, use pliers to hold fabric tacks or nails. Again, save your fingers, they aren't pretty when they're black either. Check out more DIY tips on the website here.


However, a French Manicure IS sexy. This is a cute idea for perfect nail tips every time. (Not sure I'd go with yellow, but...)


DIY French Manicure
Photo here
 
 
Random fact, but, I love eggs. Not as much as ice cream, but they're up there!


Here's a cool idea. To separate eggs, I usually crack the egg into my hand and let the whites separate through my fingers, keeping the yolk in tact. Easy, but kinda yucky. This is not only cleaner, but a way cooler way to separate egg yolks! (Visit the website where I saw this here.)

How cool is that? Don't you want to just run to the fridge and grab an egg?


Speaking of eggs. My lil guy loves to help cooking. His motor skills aren't quite up to egg-cracking yet, so we remove a lot of egg shell pieces. Just use a piece of the shell to fish out the tiny pieces from your cracked eggs - for some reason, the shell pieces are attracted to each other. (Awww).

One more egg tip: fresh eggs are way harder to peel than the older eggs. So if you're making hard-boiled eggs, try to use the "older eggs". (Not too old, "green eggs and ham" makes a cute story, but I'm pretty sure would make you sick.)

And now for something completely different:


Martha Stewart strikes again - make an extra fold in your wrapping paper to create a pocket for the card. Love it.


(Note: I don't buy expensive wrapping paper. I use a roll of brown paper used for shipping. You can decorate it with stamps, twine, burlap, etc...)


Now on to one of my favorite tips, because with very little effort, this cooking tip makes you seem like a Chef to your guests. So here it is:  Everything tastes better with bacon, and that's the truth! (You can use vegetarian bacon, too!). Make veggie bundles with green beans or asparagus. Nice presentation and delicious.

paleo friendly side dish

Do I need to tell you that chicken, pork, shrimp and fish are awesome wrapped in bacon too? Visit skinnytaste.com for tons of cool recipes.

Do you make your own wreaths? There are tons of ideas out there, so I bet you do!


Here's a super clever idea for wreath making: go to the plumbing department at Home Depot and grab a six foot long piece of foam tubing for $.97! Snip the length you want and duct tape the ends together.  Wreath tutorial here.


Speaking of wreaths: Here's an easy way to hang a wreath with no damage to the door - hang a command hook on the opposite side of the door, like so.


So that's a pretty good list to start with.  I now have to stop playing and go out and pull weeds - Boo! I know, I'm a baby because I hate pulling weeds - so as I mentioned, I tried to look up "tips on pulling weeds", and didn't find any useful ideas. I'm not too happy about that, but I think I have a plan:

So what have you got for me? What are your favorite tips or tricks for around the home?

Parties I'm at Saturday:

SATURDAY


Parties I'm at Thursday:

 Great Idea Thursdays at A Handful of Everything


Tuesday, May 21, 2013

Doin' That Front Porch Thang...

With news of the devastation in Oklahoma, I want to say how very sad I am, as we all are, for those who have lost everything. Praying for some relief for everyone affected.

Things are coming along here. Several days ago I posted ideas for decorating my front porch, which you can read HERE.

I am nowhere near finished, but have been making a start at the porch re-do. It has been somewhat hindered by our new tenants, the bees. Several phone calls and no one seems able to give us a quote on removing said bees. Therefore, I'm trying to garden and decorate, albeit a little jumpy as the bees get too friendly. Dive bombing bees can be disconcerting! So far I haven't been stung, so I carry on.

Here are a few things I've been working on:

The easiest quick fix I've done so far for the porch has been painting the pots. I've decided to go with black, although I'll probably add in some more colorful pots as the summer goes on. Funny how much difference a quick coat of paint can make.

From YUK:


To NOT TOO SHABBY:


(Look how much more the details on the planter show up.)

After I dusted the pots, making sure to rub off any chipping paint, it took two coats of black spray paint to give them a good cover.  I've got quite a few more to do, but need to make another trip to Home Depot to replenish my spray paint supply!

A few weeks ago I made a wreath for the front door. It looked pretty cute for the beginning of Spring.


But I decided it should be in full bloom by now! Enter the glue gun and some more fake flowers from the dollar store:


Next up I bought some curtains. I found some sheer panels at Big Lots, which were on sale for $5. I was thinking of something more colorful, but now I'm pleased that I chose a more neutral light brown.


I used tension rods to hang the curtains. I'm not too happy with the "brass", so the rods will get a spray with white paint in the near future. I love the way the curtains flutter in the breeze. They really make the porch look cozy. In fact, I took them down to adjust, and when Big A walked out he commented how boring the porch looked without them. They just seem to fit the space.


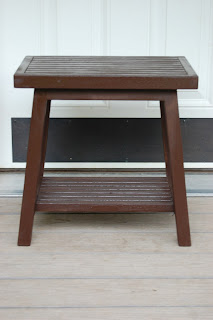
Next up is painting the rockers. They have a matching little table, which I guinea pigged and painted an "espresso" brown. I wanted to make sure that I didn't prefer brown before I committed to painting the chairs. Now that I've painted the table, I'm certain I want them to be a glossy black as I originally thought.


The brown looks a little too BLAH to me. Don't you think?  
Now, just to keep it real, let me tell you about a little mishap I had. When I went to take the lid off the spray paint to paint some of the pots, I happened to pop off the little white spray nozzle. This happens once in a while.


And it's an easy fix. But in my infinite wisdom, I tried to push the little white spray thingy back on, and proceeded to spray myself full in the face. (Not so smart. And not so pretty. Spray paint does not double as eye-shadow as it turns out.)

With my face painted and my eyes burning, I felt my way (arms out, eyes scrunched closed) up the cellar stairs and down the hall to the bathroom to wash my face. And I thought, "Ooh, that's why they say to wear protective goggles".

So, regardless of my mishap - the show must go on. I have to paint the chairs, find rugs, finish the pots, and then PLANT. I also plan to paint the front door black, but I need help from Big A on that one. I'm planning on having this done by Memorial Day. Yeah, next week.

In the meantime, hopefully, I will manage to get rid of the bees. And keep the air-headedness to a minimum.

So what about you? Do you have any outdoor projects going on? I'd love to see them!


Linking today:

TUESDAY


Thursday, May 16, 2013

Stop Vegetable Nudity


Nudity is just not appropriate at the dinner table. It frightens the kids. So let's put an end to this unnecessary evil, and dress our vegetables!

These quick and easy sauces not only add some decorum at the dinner table, but, you might find the kids (and hubby) actually enjoy veggies when they're dressed!

I always feel good about myself when I'm eating veggies - and I feel especially pleased when my family is eating them. But, if you're anything like me, food is just a vehicle to get yummy sauces into my belly! With all of the summer veggies hitting the farm stands and super markets, it's a great time to try some of these easy sauce recipes.

If that isn't reason enough, most of these recipes can be made very low cal and diet friendly. Give them a try!

Sesame Garlic Sauce

This is perfect over steamed pea pods, sauteed red peppers, or any veggie stir-fry. Plus, this takes literally 2 minutes to throw together.

1 garlic clove, minced
1 1/2 tablespoons sesame oil
2 tablespoons soy sauce
1 tsp brown sugar
1 teaspoon sesame seeds

Directions:

Stir fry the garlic in the sesame oil for 1 minute. (Don't let it brown or burn)
Whisk in the soy sauce and brown sugar.
Remove from heat and stir in the sesame seeds.
Pour over any sauteed, or steamed veggie you wish.

Thai Peanut Sauce

If allowed, my kids would eat this with a spoon! Serve it over any veggie, especially veggie kebabs done on the grill. Also great with grilled meats.

4 tablespoons creamy peanut butter
4 tablespoons rice wine vinegar
4 tablespoons soy sauce
2 tablespoon brown sugar
2 teaspoon garlic powder
1/4 teaspoon ground ginger
a pinch of cayenne pepper

Directions:

Combine above ingredients in a small sauce pan and stir over med/low heat until creamy.
You can double or triple to make as much as you need.
Also, very good with fresh garlic and ginger (minced) if you have them. But my kids prefer the ground versions.

Chipotle Cream Sauce (COLD)

This sauce has a little kick! (It uses chipotle chilies in adobo - found in a can in super market). My kids like spicy food, and this goes great with any grilled veggie or meat. I make this up and keep it in the fridge, to serve whenever I need it. (Serve cold).

1 cup sour cream OR plain Greek yogurt
1large fresh minced garlic clove
3 tablespoons chopped fresh cilantro
1 tablespoon fresh lime juice
1 tablespoon minced chipotle chilies
a pinch or two of sea salt (to taste)

Directions:

Mix all ingredients except chilies in a bowl.
Take one of the chilies with the sauce on it, and mince/mash with a sharp knife.
Add the chilies to the cream mixture.
Taste and adjust for salt.
 
Chipotle Cream Sauce (WARM)
 
Another sauce with some warmth, just so you know! This is really good over sauteed baby spinach, or over fresh corn.
 
2 tablespoons butter
2 tablespoons minced shallots
2 cloves garlic, minced
1/4 cup chicken broth
3 tablespoons dry cooking sherry
1 cup sour cream
1 chipotle chili in adobo, minced/smashed with a knife
salt, to taste
pepper, to taste

Directions
 
Melt the butter in a skillet over medium-high heat and sauté the shallot and garlic for 2 to 3 minutes.
Add the broth and sherry, and simmer another 3 minutes.
Reduce heat to medium-low and whisk in the sour cream, then the pureed chipotle.
Simmer for a couple of minutes to heat through and season with salt and pepper.


Creamy Parmesan Cheese Sauce

This is my go to sauce for asparagus, zucchini, broccoli, cauliflower... you get the idea! Goes great over pork chops and chicken too. If you're into it  - substitute Gorgonzola or blue cheese for the Parmesan.  YUM!
 
8 ounces cream cheese, cubed
1/2 cup grated Parmesan cheese (to taste - add more if you think your sauce needs it)
3/4 cup milk
1 tbsp butter
1 large clove garlic, minced
1 dash Tabasco
Fresh ground black pepper to taste
 
Directions
 
Melt butter in a small non-stick sauce pan.
Saute garlic for a minute, but do not let it brown or burn.
Add the cream cheese, and let it melt.
Add the milk, slowly, stirring to incorporate.
Add your cheese and stir constantly to let it blend.
Add Tabasco and black pepper.
Simmer to keep warm.
 
Note that I have used cream cheese, sour cream and milk for these recipes, but feel free to use lower fat versions. I do on occasion and it doesn't affect the flavor.

So what do you think? Do you have any veggie sauces to share? I'd love to swap!


Wednesday, May 15, 2013

Front Porch Decor


Hello There!
 
It's a rainy day, so I'll be honest, my job for today is scouring Pinterest and the HGTV website for ideas and inspiration for our front porch. It's working! I feel inspired and excited. Here's my conclusion: With a little bit of work, a few bucks, and some sunshine, we're going to have a comfy front porch this year.
 
Here are a couple of pictures of our house and front porch (they're old pix, and don't show the foundation garden we put in last year, but I'm not going out in the rain to take a new picture for you - I might melt).


As you can see the lattice is black, as are the shutters. (It's funny, in these pictures it looks like we could be in a development, but we're actually in the middle of nowhere land, with trees all around us!)


See, this is my front yard!
 
 
Sorry, I get sidetracked.  So, the porch is pretty long and skinny, therefore, my seating options are somewhat limited. Either side of the front door there is room for a small cafe table, or a few rockers.

The first thing I want is a couple of runner sized indoor/outdoor rugs. That's about the only size rug I can fit.  I did search around various blogs and Pinterest for tutorials on making my own rugs. A drop cloth rug may be something I could do, but with all I have goiong on this summer (weddings, birthdays, graduations) - I'm hoping to buy a rug or two.  I feel kind of guilty, but, here's one I love. Yellow is my favorite color, and I think it would look great on either side of the porch.


This porch below is about the shape and width of our porch.  I am loving the curtains. I am going to hang curtains on the far ends (not along the front). I want something breezy and colorful. I'm making my own, using fabric from the fabric store.

Handmade curtain panels by Lori Lawson
 
When I look at our front porch all I can see is the white front door. Look at me, I'm boing! (That's what it's saying to me - or maybe that's just the voices again). Anyway, my hubby, Big A, agrees that the door looks boring, and we're painting it black.
 
 
So, I did a little research, and found a tutorial on painting the front door. Sounds easy enough.
 
 
painted-black-door

How to paint your front door HERE.
 
Another easy fix for the porch is to paint all of the pots. Whether they're plastic or ceramic, a coat of fresh paint (spray paint works), is an easy upgrade. Just remember it's important to use paint that will withstand the elements outdoors.

I've been checking out the local garden centers. All of the different colored pots are beautiful. I'm especially drawn to the gold, but I have to admit, gold wont work for our home. Not this year anyway. Everything is so new, (we built our home just 2 years ago), the gardens are a work in progress, and the grass hasn't fully grown in yet. 

I'm thinking the gold might be "making a silk purse out of a sows ear", as my great-grandmother used to say. I don't really know what that means, but gold would be too fancy for our home. I think black for the larger pots and some colorful little guys, would look a lot better.

The pot below is great - just paint a large pot and put our house numbers on it. I can do that!


We have two rockers, similar to the one below, which were a gift from my parents. They're natural wood, and unfortunately, they were attacked by the dog.  Hey, it's hard to tell the differece between a chair and an intruder. SO, the chairs get a makeover - wood fill for the chew marks, and a new coat of paint too. I think they'll look gorgeous painted black.
To match the yellow rug, I'm thinking some yellow patterned pillows for the black rockers.
I like the stripes and patterns above.  I'll make my own DIY No Sew Pillows. (All I'm going to do is use two tea towels, glue gun the edges and fill with fluffy stuff.)

My favorite idea, is one I used at our old house. I am going to put Hostas and Coleus in the long window box planters, and put them along the front railings. As the plants grow they create some height and natural privacy. Plus, they're pretty easy to grow, and very colorful.


To hang them along the railing, I use the brackets below:


They hook over the railing, and they adjust to the width of the planter, which is handy.

Now, in case Big A, wasn't paying attention, this is the rug I want. What? I'm just giving him ideas for my birthday!


So what are you doing for your porches. Got any cool ideas?