Pages

Tuesday, April 29, 2014

Hanging Candle Holder Using a Mason Jar

mason jar crafts, hanging mason jar, mason jar candle holder, mason jar ideas

Have you got five minutes? 

Oh good! I'm all about five minute decor! How about you? 

(Strangely, my 6 year old is almost always the only one to notice the changes I've made around the house ~ no matter how tiny! He loved these.) 

While grocery shopping one "Spring" day (read: "supposed to be Spring, but there's snow on the ground" day) I found a package of four, cute little mason jars at Wegman's for about $5. 

When I got home, I thought about painting them, but then I was too tired and cranky about the weather I had the brilliant idea to hang them in a window, with a tea light.

I don't dare light "real" candles, with a little one and a cat, so enclosing an LED tea light in glass, gives the effect of a flickering flame, without the fire hazzard. 

mason jar crafts, hanging mason jar, mason jar candle holder, mason jar ideas

I used hot glue to secure the jute twine around the mouth of the mason jar. Filled it with glass beads and put in a tea light... 

5 minutes ~ tops! 

Clear Command Hooks worked perfectly for hanging them in the dining room window, where they catch the sun light and produce beautiful reflections and light prisms, during the day. 

In the evening the tea lights create the perfect soft glow. So pretty. 

mason jar crafts, hanging mason jar, mason jar candle holder, mason jar ideas

When the temperatures eventually warm up, I may hang them on the front porch, so that we can enjoy them outdoors.  

And, as no doubt will happen, I will get tired of the beads, in which case, I can easily change them and fill the mason jars with yellow lentils, or coffee beans... or I think they would look super cheery and bright with dried split green peas. 

Don't forget to subscribe to my newsletter! (Above) 

If you would like to join in some fun link parties, head on over HERE


Sunday, April 27, 2014

Pop Top Picture Hanger


Hello! Happy Sunday! 

I poured my sugar packet on the counter and threw the wrapper in my coffee (not the first time I've done this)! When this happens I know it's a good day for me to stay away from power tools. 

With that in mind, here's something fairly straightforward for my project du jour. 

fix a broken picture frame, picture hanger, pop top picture hanger

I have tons of picture frames that are missing the hanger, so, I'm fixing them today. 

fix a broken picture frame, picture hanger, pop top picture hanger

This is my favorite simple way to solve the problem.

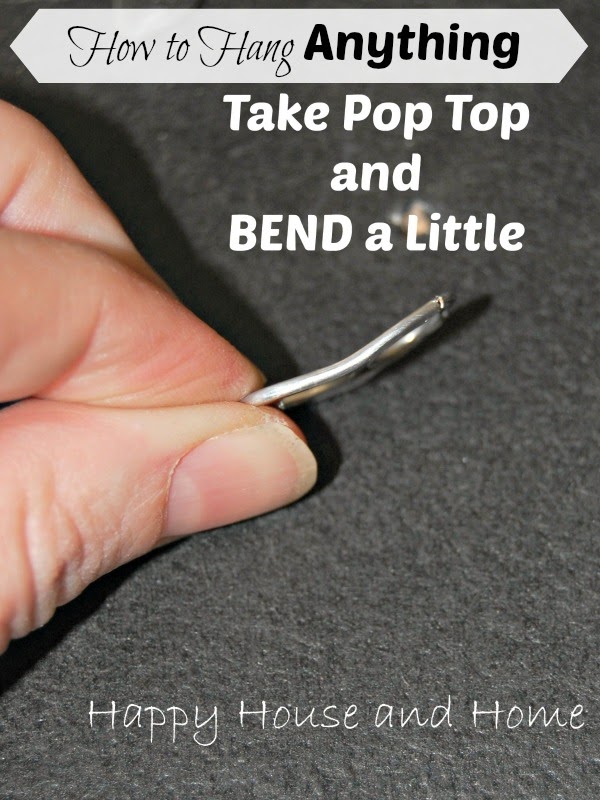
Measure the exact center of the piece you need to hang, and down about 1" from the top of the frame. 

fix a broken picture frame, picture hanger, pop top picture hanger

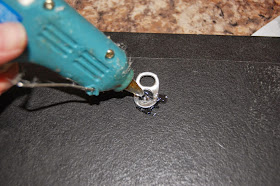
Hot glue the bent pop top to the center. When dry, hang! 

(Go here for bathroom sign)

This also works for hanging plates, signs, etc. Just make sure to measure to the center of whatever you want to hang. 

Don't forget to subscribe to my newsletter! (Above) 

If you would like to join in some fun link parties, head on over HERE

Saturday, April 26, 2014

Framed Sand Dollar - DIY Wall Art

sand dollar, framed sand dollar, DIY wall art

I love sand dollars! They're so fragile and beautiful. But with 3 clumsy little monsters ~ wait, what? I mean... with 3 beautiful and energetic children ~ it's hard to display sand dollars. In my case it means framing them, or keeping them waaaaay up high!

We just returned from an amazing Spring Break on Jekyll Island, Georgia. We have tons of awesome pictures (on FB) from the trip, and lots of fun memories. It's such a beautiful place.

sand dollar, framed sand dollar, DIY wall art

Every year one of my fondest memories is of walking along the beach finding sand dollars. Many of the sand dollars we find are still alive, and we happily throw them back in the sea. Sometimes we get lucky, and we find a whole dead sand dollar ~ well, lucky for us, not so lucky for the sand dollar.

When we find a whole dead sand dollar, we pack them carefully in paper towels and schlep them back to Central New York.

They're so breakable they best way I've found to display them is to hang them up, but I'd love any new ideas!

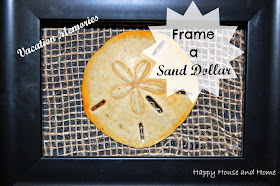
For this little sand dollar frame: All I did was use a tiny frame, some burlap, a dot of hot glue and the sand dollar. I didn't bother to put the glass back in the frame, just left it open.  I added it to my gallery wall, and it should be safe for years.


I've got a few more sand dollars, so I looked on-line for ideas to safely display them.

The first thing I realize is that I need to "harden" them. A mixture of half glue/half water (which is just homemade mod-podge) is the best way to give the sand dollar "shell super powers". Just brush the glue mixture over the sand dollar and allow to dry. This should help reduce breakage. 

Now on to a couple of ideas that I found: 

I've got plenty of pillar candles that could be embellished like so. Love. 


I love the idea of a garland ~ would be perfect draped over a mirror!


Oops! My hand slipped and I ran into a sand dollar cookie recipe. Sweet. :-)

180.1-334x500


What about you? Do you love sand dollars? What do you do with them? Do tell! 

sand dollar, framed sand dollar, DIY wall art

Don't forget to subscribe to my newsletter! (Above) 

If you would like to join in some fun link parties, head on over HERE

Tuesday, April 22, 2014

No-Sew Outdoor Pillow

no-sew projects, no-sew pillow, no-sew outdoor pillow, diy pillows, outdoor decor


See that up there? That's SUN.

Actual SUNSHINE!

                                     ...And an outdoor NO-SEW pillow.

No-sew projects make me happy, because I can't sew, and I probably never will.

(That's why I'm love with an inanimate object: My Glue Gun!

Do you sew? If you do, I suppose it would be super easy for you to sew these too.

I needed a couple of pillows to brighten up my (fake and boring) Adirondack chairs on the porch, so I came up with this idea for a no-sew pillow that is weather resistant.

With our temperamental weather, there's nothing worse than having to run outside and clear the porch every time it rains! So, I started with a cloth shower curtain that's been hagin' around for some time. (get it? hangin' around.)

no-sew projects, no-sew pillow, no-sew outdoor pillow, diy pillows, outdoor decor

I cut the fabric into two 18" squares, and placed them on top of one another, wrong side out.

Then I used the hot glue gun to glue around the edges, leaving about an inch of spare fabric. The last few inches I left open so that I could fit my hand in the gap.

(If you don't want to burn your fingers I would suggest you put a couple of band aids on, or a rubber thimble... Go to Sewlicious Home Decor for lots of Glue Gun Tips!)  

 no-sew projects, no-sew pillow, no-sew outdoor pillow, diy pillows, outdoor decor

I turned the fabric right side out.

And used on old bed pillow for the stuffing. This pillow wasn't doing my neck any favors anyway... So I cut the fabric and pulled out the stuffing, to stuff the new pillow.

If you don't have a spare pillow, WalMart sells cheap-o's for about $5. Or you could click here if you would like to buy a big bunch of fiber fill for $14:
Sax Polyester Fiber Filling and Batting - 5 Pounds - White

I stuffed the pillow, and just used more glue to finish sealing up the gap.

Voila!

no-sew projects, no-sew pillow, no-sew outdoor pillow, diy pillows, outdoor decor

One pillow took me about 15 minutes from start to finish. Once I was done, I happily discovered that my new pillows match a couple of my ceramic decorations. My little garden snail and bird are impressed.

no-sew projects, no-sew pillow, no-sew outdoor pillow, diy pillows, outdoor decor


These outdoor pillows were so easy, I'm going to make a few more for the back yard. (They were also free, because I used things I had laying around the house.)

Have you started decorating outdoors yet? We're supposed to get snow tomorrow, but the show must go on, right?!

(My little glue gun is starting to get a little unpredicatable, so I'm looking at this number one best seller ~  Stanley GR20K Trigger Feed Hot Melt Glue Gun Kit, although I'm tempted to go with something cuter, read: pink!)


Don't forget to subscribe to my newsletter! (Above) 

If you would like to join in some fun link parties, head on over HERE

Wednesday, April 16, 2014

Peep Printable and a Spring Wreath

spring wreath, wreath, spring printable, free printable

Hello from Jekyll Island! We're on our yearly family vacation, in our favorite place, but I thought I'd quickly show you a couple of things I threw together before we left! 

I know lots of you (us) are disappointed with the weather at home ~ apparently we have SNOW again. Boo. 

BUT, hang tight. It can't last forever. 

Regardless of Mother Nature being a cruel old meanie, I got two free sweet little printable: A mini-bunting from Landeeseelandeedo, and peeps from Flamingo Toes

They're both so sweet, they cheer me up. 

The "Get Your Peeps On" printable is cute - can you see the little yellow bunny is saying "yo" and has on a medallion? (Nothing like Pimpin' up a Peep!) 


The second printable, a mini-bunting, is the perfect size to adorn a wreath. 

spring wreath, wreath, spring printable, free printable

When I get home, I hope we do have Spring. Until then I hope you all are having a wonderful week. 

spring wreath, wreath, spring printable, free printable

Happy Easter!!! 

Thank you to Flamingo Toes and Landeeseelandeedo for the printables! 

Saturday, April 5, 2014

Gallery Wall Hides a Thermostat!


Hide a Thermostat, Gallery Wall

The photo below shows a little corner of our living room. The thermostat, the double light switch, and the electrical outlet... So chic! So interesting! So NOT.

Hide a Thermostat, Gallery Wall

And then... Little Brags posted about Hiding a Thermostat in Plain Sight. That gave me inspiration to do something similar.

Hide a Thermostat, Gallery Wall

I want to fill it out a little more, but for now, it's a bit better. I don't think the switch plate and the thermostat stick out quite as much now. Yes! 

Thank you to my new hero ~ Little Brags! 

* I notice on Pinterest that some people are hiding their thermostat under a picture or something similar. I don't suggest you do that, because it won't sense the temperature of the house properly if covered completely. Just an FYI ;)


Don't forget to subscribe to my newsletter! (Above) 

If you would like to join in some fun link parties, head on over HERE

Thursday, April 3, 2014

Window Décor For Less

To continue or begin a house-updating project, get the best in ideas for inexpensive window treatments. Drapery and blinds are a staple, so saving on these items in a meaningful way will affect your budget significantly. If you need to buy window décor, why not save at the same time, and have a lasting product where you can save money on great quality product, and really see the difference.

Outdoor Shutters

When purchasing shutters for your home, consider the cost as an investment to save you money in the long run. If need be, consider payday loans online for this long-time savings investment. The cost will be an important part of saving you money and energy on the home’s energy bills.  By increasing your home’s insulation with shutters, you are more likely to let less energy out through inefficiency. Keeping the shutters affordable when you purchase them is important, as long as there is no expense in quality – if the quality goes down, so does your margin for energy efficiency. Get more than one estimate on your window shutters to make sure that you have understood all the pricing information, and gotten the best deal on product and it’s installation.

Bamboo Blinds & Shades

If you need an effective way to have style and stay on budget, try bamboo shades and blinds. Often inexpensive, they come in plentiful sizes, and are also available for custom cuts.  These shades will increase privacy, as well as moderately increasing the efficiency of the energy in your home. Take care to measure carefully as some sizing is not easily provided, and save yourself the hassle of having to go back o the store to exchange for the right size. Take an image of your window set up to bring to the home improvement store as well, so you can also inquire about the most cost efficient bamboo blinds that will also look the best, and be the best in energy efficiency, for your home.

Refurbished blinds, Custom-Sized

One way to increase savings greatly when purchasing blinds and shutters is to look for unused or recycled window treatments.  Old sets of blinds that used to be in you home but were mis-cut or discarded, can now be sized appropriately, and used to increase the energy efficiency of your home or apartment, Ask a few contractors if they have any blinds or shades that were not used from older projects, and if they are available for resell. A lot of times you can get amazing quality, just by inquiring with a few different providers of window treatments.  Use your knowledge of the best contractors to ask them if they can also do the installation – They are more likely to do the project for resale if they get the installation of the blinds as well as a bonus. As you will probably have to custom size and install these new refurbished blinds, you would be hiring someone anyway, so enjoy those discounted window treatments for next to nothing.

DIY Curtains

Interior window décor may seem to  be difficult to save money when purchasing, as there are pre-cut standard sizes, an generally the higher quality fabric costs more.by item. Use this concept to see what higher quality fabric is available for cheaper by the yard, and cut the curtains to size yourself, and have the fabric sewn into curtains you love. Custom curtains can be the cheapest way to invest in beautiful home décor as you can make tem from old tablecloths, blankets, or any high quality fabric you like. Or purchase a new fabric by the yard for an interesting and unique money saving deal on curtains.

Mod Podge a Glass Table Top

mod podge, burlap crafts, mod podge and burlap

Hello there peeps! I hope this finds you well!

Today I need to ask you a favor.

I made this little table top, but I am stuck, and I need your advice.

Big A and I have three tables - two are end tables, and one is a coffee table. They're all glass topped and I dislike them. A lot. Because they're see through, I also walk into them. A lot.

All they do is collect dog nose smears, finger prints, and show every single crumb and minuscule particle of dust.

I can't afford to replace them, but for the past couple of years, I have been keeping my eyes open for something fun, in thrift stores and at garage sales. Nuttin' honey.

Meanwhile, I've been stewing over what to do with them for the time being. Finally, I had an idea. I would mod podge one of them with burlap! I thought it would look so rustic and cool, so I googled and searched, but I couldn't find any examples on line.

So, ignoring what may have been a fair warning to proceed with caution, I just did it.

mod podge, burlap crafts, mod podge and burlap


I laid out one of the end table glass tops between two chairs, and painted it with mod podge. 

mod podge, burlap crafts, mod podge and burlap

I put the burlap down, and then painted that with mod podge. 

mod podge, burlap crafts, mod podge and burlap

It took about four days to dry. 

When it was finally dry, I popped it back on the wrought iron base, and was completely underwhelmed. 

mod podge, burlap crafts, mod podge and burlap

It's just okay, right? It looks better than glass with dog boogers and sticky finger smears, but now what? 

mod podge, burlap crafts, mod podge and burlap

Should I put something around the edges? If so, what? Please help me! 


Don't forget to subscribe to my newsletter! (Above) 

If you would like to join in some fun link parties, head on over HERE