Pages

Tuesday, October 29, 2013

Jute Vase from an Old Unused Carafe


jute vase, craft idea, DIY vase, crafts with jute

I'm on a roll! I keep finding junk lightly used items and turning them into things I can use. I've been salvaging dollar store vases, ripping up old dresses, and digging through the garbage for jars.

No, this is not an episode of "Hoarders: Buried Alive". I'm thrifty.

Yesterday I continued my foraging, and found an old wine carafe. SCORE! I think. I've never used it. I mean, my wine always comes in a bottle, all of its own.

I thought maybe I could use the carafe to serve water, or iced tea... Nah. I have pretty pitchers for that, not to mention, my fridge has an ice and water dispenser.

Hmmmm, what's a girl to do with an old wine carafe?

With an obvious inability to let some things go, throwing the carafe out wasn't an option. But gluing jute rope to it was. It is a score! See?

Would you like a tutorial? Okay!

1. Plug in your glue gun, and grab a ball of jute or twine.


2. Wrap and glue. Wrap and glue. Wrap and glue. (Or maybe it's glue and wrap. Glue and wrap.)


3. Do that, until the carafe looks like this:
 
4. Stick it next to some of your other junk treasures, and decide it needs something. 


5. Play dress up.


See my pretty necklace?
 
6. Step back and be happy!


C'mon by tomorrow! I'm making (yet another) sunburst mirror, with (yet more) sticks! Ya know you can't miss that!

Saturday, October 26, 2013

Glitter and Graupel

Hello there! Is it my imagination, or has autumn come and gone already? I fear it's almost time to start thinking about gloves, and (gulp) snow shovels.

glitter, tea lights, candle holders, DIY candles
I've been watching the leaves swirl around our yard, as if caught in mini-tornadoes. The past couple of days the high temperature has been 45 F, with wind, and rain, and one day, graupel. You may ask - What is graupel?  I'm not 100% sure, but it's a fancy meteorological word for wintry white stuff.  So, the other day, I stood looking longingly at my back yard, where I still have my saw horses set up, dreaming I was outside working in the sunshine with a warm breeze blowing.

Instead, I turned on the heat, and went rummaging through my craft supplies and spray paints in the basement. I grabbed glitter. (Lately, it seems whenever I'm looking for something to do, and it's too cold to go outside, I reach for the glitter.) I particularly love gold glitter.

Then I went dumpster diving at my parents house. They have a new addition going up at their house, and in preparation, they're doing a major clean out. That's right, I have no pride, but I've scored some great stuff because of their new bedroom! However, I need to remind myself that "one man's trash may be another man's treasure" -  but sometimes, it's just trash.

So I told myself that, and then I grabbed a couple of old pimento jars. What? They're not trash! They have cute little handle things.

And when I gave them a coat of glitter and a little twine... Well, now they're my treasures!


They came out cute. And luckily, they go perfectly with graupel. :)

Here are a couple of coupons for my readers! Just click and print!

Tuesday, October 22, 2013

DIY Fabric Strip Valance


fabric strip valance, DIY valance, make a valance
Fabric Strip Valance
I needed a valance for my sliding glass doors off of our kitchen. I didn't want to block out any light, but it really needed something. A valance at least.

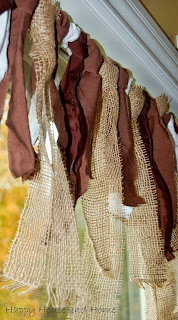
Strips of fabric, in various lengths, and colors make an easy, rustic DIY valance. I've seen these all over, and I LOVE them! I'm drawn to that whole shabby/rustic look. So I set my mind to making one.


I don't sew, so I don't have a bag full of nifty fabric strips. Nor did I want to spend money buying fabric, just to rip it to shreds. However, I DO have a closet! And like most of us, I had a few items that didn't fit anymore I didn't want to wear anymore. Where there's a will, there's a way.

I found a couple of brown dresses and a white shirt, and threw in an old pillow case and some burlap. Voila! Fabric strips. (I had to pinky promise my husband that I didn't use any of his shirts - man, he's suspicious!)

To make the strips, I used scissors to start the rip, and then tore the fabric about 18" long and 2" wide. Some were shorter, some were longer. (I wanted the sides and edges to look a little frayed, so I ripped, instead of using the scissors to cut the strips.)

The burlap was cut a little differently. I pulled individual strings every 2 inches, and then cut along the lines. It naturally looks very frayed.


Once I had a million or so strips, I tied them onto a tension rod, and hung it up. (The tension rod doesn't show at all, so no need to spray paint it to match décor - yay!)


All and all it was an easy DIY.  It only took me about an hour, and I didn't spend one penny, as I already had the tension rod. The only downfall was that there were burlap fibers all over me, and the kitchen! I don't recommend you wear black when you work with burlap! I know this, and yet I do it every time..

Anyway, I like it a lot!


Here's the valance, showing our sad looking back yard - patio and/or deck - coming soon (to a theater near you...).
 
 
I love the rustic look of the valance. But if you want to make a fabric strip valance that isn't as "shabby" looking, you could certainly use ribbon, or buy pre-cut fabric.

Friday, October 18, 2013

Upcycle a Vase - Budget Friendly!

Hello and welcome!
 
Today I made this beautiful gold and twine vase.
 
Honestly, it started out as a FAIL, but now I'm
happy
happy
happy
with the result. 

twine craft, vase with twine, upcycle project
 
I'm one of those people whose ears turn bright red when they lie, or who rub their noses incessantly if they're stretching the truth. So, I'd feel guilty if I didn't tell you exactly what went down.
 
 Here's the sad truth of how I just HAD TO save a 1$ vase, no matter what.  I hate giving up.
 
I had a clear hurricane vase from the Dollar Store, which I bought sometime last year.  I decided to tape off the top of the vase, and paint the bottom 2/3rds of it gold. I had to paint 4 coats to get a good cover of paint, without streaks. It took a bit of drying time, but it looked great in the end. Well, it looked great until I pulled off the blue tape, and pulled away chunks of the paint.
 
DOH!
 
I even tried to fix the paint by using a small paintbrush. I didn't want to throw the vase away.
(I know, it's ridiculous - the vase cost me a dollar, a year ago!)

 
Determined to save the vase (and my dollar!),  I realized I could use jute. I sat down and wrapped the top with twine, and kept wrapping until the twine covered the messed up paint.
 
All I had to do was wrap the twine, using thin lines of hot glue, little by little. (If you do this, you will notice the glue leaves little strings - just let them dry and they pull right off when you're done.)

 
Wrapping the twine is fairly time consuming, but look how pretty!
Now I need to figure out where to put my vase - and what to put in it.
For now, it's got sticks - I love sticks!

 
I love the gold with the twine.

 
I love that the twine covered up the bad paint.
And I love that the paint covered up the boring vase.
What started out as a loss, ended up a win!

Tell me - do you put time and money into a project just because you refuse to give up?


Friday, October 11, 2013

Organizing Garden Tools

Big A usually rolls his eyes at my DIY ramblings. Or, much like Miss Kay and Phil from Duck Dynasty, I keep talking and talking, while Big A nods and pretends to be listening to me.

(Not that I'm obsessed with Duck Dynasty or anything, but you really should watch that!).

I can't say that I blame Big A. I can go on for half an hour about how great it is that I found burlap for $3, or that the thrift store has 40% off on Tuesdays, or that I found an UNOPENED bag of wood shims in the basement (!). It's not surprising he finds it hard to share my enthusiasm. Too bad he's not Ryan:
Best Ryan Gosling Hey girl memes

So you can imagine my surprise, when, one day, as I was going on and on talking about a clever project I had seen on Pinterest, Big A was LISTENING

Everyone has tons of rakes and shovels and garden-y type tools that lean in the corner, right? And of course, the one you need is at the back of the stack, so when you grab it and they all fall over... Well, no more! The clever idea was to secure pieces of PVC to a board and used it to corral the tools. So of course, I explained this to Big A (admittedly, in great detail).

LO AND BEHOLD - Big A actually said he liked the idea!

I fell over and yelled, "Someone get me the paddles, STAT! I'm going into disbelief-arrest!!!"

Once I recovered from the shock, to further my amazement, my hubby actually went down to the basement and made the DIY project I'd been (so eloquently) talking about!


As you can see he just screwed the PVC to the plywood, and voila! Not too bad. It keeps them out of the corner, and from falling over! My life is now complete - now if I could just get up off the floor...

To see the original idea that I was referring to click HERE.

Thursday, October 10, 2013

Pumpkins for the Pumpkin Carving Challenged

pumpkin carving, pumpkin crafts, pumpkin muffins, pumpkins

We haven't been pumpkin picking yet. So this weekend is going to be busy. Good thing I have lots of fun ideas from lots of fun bloggers.

(I don't feel too bad not pumpkining yet - a few years back I got our pumpkins earlier in the season, and the squirrels made themselves at home IN my pumpkins, while apparently trying to chew their way out. That very same year, I had pumpkins on display inside, and one of those beauties got so ripe - read ROTTED - it took the finish right off the table. Last minute pumpkin picking is the way for me!)

Now, traditional pumpkin carving is great - and all of our older kids LOVE it. However, there's a little snag - the little one, who is now 5, literally gags when carving pumpkins. It's bad. I don't know if it's the texture of the pumpkin guts, or the smell. Either way, we need something that doesn't involve carving for our little pumpkin.

Because of that, I've gathered a few ideas, that he will be able to help with, and hopefully avoid him losing his lunch!


source


DIY Glittered Pumpkins. I am glitter obsessed, and this is perfect for the kids. Even the youngest can manage some glue and glitter on a pumpkins.

288863763570504804 DIY Glittered Pumpkins


These painted gold/copper pumpkins look amazing with twinkle lights! WOW! (There's no website given, but they're beautiful!) I would love to arrange some painted fake pumpkins on my hutch with twinkle lights.

Rose Gold + Black = Pumpkins


Gold Thumbtack Pumpkin by Madigan Made. Beautiful, albeit time consuming. I imagine the older kids could go to town with the thumbtacks and a smaller sized pumpkin.


Beautiful! Tutorial for gilded pumpkins with brass tacks at madiganmade.com


The Confetti Pumpkins by Made in a Day, is beautiful too. These would certainly be easy enough for even young kids to help.

Confetti Pumpkins

Carving with a drill at The Garden Glove. Of course, adults would have to do the drilling, but the kids would definitely love the effect! You can even drill little holes and stick lollipops in the holes for trick-or-treaters to grab on Halloween.

pumpkin drilling

One of my FAVORITE ideas is the Sweater Pumpkin by Craftaholics Anonymous. It's a sweater, filled it with grocery bags! And it's just plain awesome!


The Washi Pumpkin from I Heart Naptime is adorable, and another idea that the little ones can help with.


This image is from Pinterest, so I apologize, there's no tutorial. But if you have a plain wreath, seems it would be easy to hot glue the mini (fake) pumpkins, and add a big black bow... I love it! Mini pumpkin wreath
How easy and cute are Sharpie Decorated Pumpkins from Simply Modern Mom. White paint and a fancy sharpie color!


AND what's a pumpkin roundup without a pumpkin recipe? Seriously, all that decorating makes me hungry!

 
Pumpkin Muffins


Preheat the oven to 350F.

GET: 1 box carrot cake (15 oz), and one can of pumpkin (15 oz).

Take the carrot cake mix. Dump the contents in a big bowl.  DO NOT add anything the box calls for, just the powdered mix.

Now take the can of pumpkin. Put that in with the cake mix. That's it. Don't add the eggs, or whatever else the box calls for.

Stir, stir, stir!  Stir til it's all mixed up, and you have arms like Popeye. Then put the whole gooey mess in a gallon Ziploc baggie. Trim the corner off and "pipe" into muffin tin (with liners). Or just use a spoon an fill the liners. Either way, it will not look very good at this point. You'll see. Pretend not to notice and carry on.

Bake at 350 for 15 minutes.  While the muffins bake, make this recipe for frosting. You could just buy frosting, but I make my own frosting because it's easy, and it comes out fluffier than store-bought.

Cream Cheese Frosting
 
Ingredients:
    • 8 ounces cream cheese
    • 1 tbsp. butter 
    • 1 c powdered sugar
    • 1 teaspoon vanilla extract
    • 1 pinch salt
    • 3 tablespoons milk
Directions:
  1. Blend softened cheese and butter in mixer.
  2. Blend and whip in the sugar and vanilla. (you can add more sugar to taste)
  3. Beat in enough milk to get the right spreading consistency. (Not too thin, not to thick, just right, okay?)

When the muffins are done, let them cool. Don't eat them yet! They're about to get fabulous. Well, better, at least.

Take each muffin and slice it in half, like so:


Then frost the middle. THAT WAY you don't get frosting on your fingers. Eat 'em up and share 'em to your kids. Just don't tell them how you did it - you'll be a rock-star.
 
 
Pretend as if you've been baking pumpkins, grating carrots, sifting flour, and whisking eggs all day. Maybe even put on a fancy baking apron before everyone gets home.


Monday, October 7, 2013

Framed Pine Cones

pinecones, pine cones, crafts with pinecones, craft project
 

Gathering pine cones with the lil man is one of our favorite things to do. We've collected lots of them, so we're always trying to find ways to display them.

Yesterday I found an old frame stuffed tucked away in our Narnia Closet, so I thought I'd pop it in the kitchen window and put some of those pine cones to use. I glued the pine cones to strips of polka dot ribbon, and hung the ribbon from the back side of the frame using thumb tacks.

It's a terribly gloomy day, but here's an iphone pic with another view.


Now I'm off outside to pick up my porch cuz the wind has blown everything over. I do believe a stormzacomin!


Sunday, October 6, 2013

Coffee Creamer Recipe

coffee creamer recipe, homemade coffee creamer, powdered coffee creamer recipe


I drink A LOT of coffee. With powdered creamer.  I know, classy!

I'm not happy unless my coffee looks like a hot milkshake, and running out of creamer makes me cranky. SO, it crossed my mind that I should make my own coffee creamer, to save running out so often, and to save some money as well. I don't like flavored coffee, so I found a Plain Jane recipe on food.com.

This took all of two minutes to mix together. (Not including the 45 minutes at the store, searching high and low for instant dry milk, and coconut oil. Coconut oil is in the health food area, and dry milk is in the baking aisle, FYI.)

Powdered Coffee Creamer
Makes approximately 2 1/2 cups

2 cups instant nonfat dry milk
¼ cup powdered sugar
2 tablespoons coconut oil, melted

Combine dry milk and sugar in a bowl. Add coconut oil, drizzling it over the top while mixing with a fork. Mix well until there are no lumps. Put it in a jar with a lid  and give it a good shake. Once you have it all mixed up, you can store it in the pantry.

The verdict: It tastes almost exactly like the store bought stuff, and making your own coffee creamer does save money - it costs about half the cost of buying the store brand.

It's probably worth it to make my own, but I doubt I'd do it on a regular basis, simply because I'm lazy. (I'm not even gonna feel guilty about that!) BUT I will say, IF I liked flavored coffee creamer, this would be the BOMB (yes, my kids are going to make fun of me for saying that). The homemade version is super easy to flavor-up, and this would make a good hostess gift, so I will make it again.

For flavored coffee, add any of the following:

1 tsp vanilla extract
1 tsp almond extract
1 tsp orange extract
1/2 cup cocoa
1 tsp peppermint extract
1 tsp cinnamon
1/2 tsp nutmeg

You get the idea! Just add one of the above (or combine a couple) to the dry ingredients, put the lid on, and shake for a few minutes to mix thoroughly.

What else could you flavor the creamer with?

Thursday, October 3, 2013

Oatmeal Lace Cookies


Big A is in the basement building shelves and de-cluttering... or cluttering, it's hard to tell. So I thought I'd do the good wifely thing and bake a batch of cookies for him. (Plus, I didn't have any breakfast.)
 
I decided to throw together a batch of Oatmeal Lace Cookies. Because you melt the butter rather than wait for it to soften, these Oatmeal Lace Cookies take less than 5 minutes to throw together, and only about 9 more minutes to bake.

Now, I'm sure you have heard me mention, I'm not cut out for baking. So I'm always finding recipes that are completely idiot-proof! That doesn't mean I won't burn the house down in the process of baking, but the recipe will be easy to follow.

This recipe for Oatmeal Lace Cookies is one of those recipes. It requires very limited time, effort or patience. And, when they are done, they look beautiful - golden, with little spaces between the oats, like lace. Plus they're delicious - the sugar caramelizes making them sweet and buttery! They're great on their own, but become downright addicting with vanilla ice cream.

But wait! Wanna know more good news? You don't even have to wash the cookie sheets, because they are lined with parchment paper! Yes!


Oatmeal Lace Cookies

Makes 18 cookies (or less if you eat any of the batter, but who would do that?)
 

Ingredients

    • 1/2 cup butter
    • 1 cup quick oats
    • 3/4 cup sugar
    • 1 egg, beaten
    • 1 teaspoon vanilla
    • 3 tablespoons flour
    • 1/4 teaspoon salt
    • 1/4 teaspoon baking powder

Note: you could eliminate the flour to suit your diet if you wish.

Directions

  1. Preheat oven to 350 degrees.
  2. In a large saucepan, melt the butter. I let my butter brown a tiny bit (trust me).
  3. Remove from heat and stir in oats, sugar, egg, and vanilla.
  4. Add flour, salt, and baking powder.
  5. Drop 3” apart by rounded teaspoonful on cookie sheet lined with parchment paper. They spread quite a bit so make sure to give 'em some room to grow.
  6. Bake at 350 degrees for 9-11 minutes or until golden.
  7. Remove from oven and let cool completely on cookie sheet. Carefully remove from the parchment with a spatula to a wire rack.
  8. Store in an airtight container (Yeah, right! You won't have any left to store).


If you want to make your cookies FANCY, you can choose to add one of the following:

  • Add 1/2 teaspoon almond extract for an almond flavor.
  • Stir in a handful of mini-chocolate chips to the finished batter.
  • Stir in a handful of chopped nuts - especially pistachio!
  • Add 1 teaspoon grated lemon zest or orange zest.
  • Melt semi-sweet chocolate and spread thinly over the flat side of the baked and cooled cookies.
Try them and let me know what you think! As always, I would love to hear from you!