Pages

Saturday, September 28, 2013

How To Paint Kitchen Chairs

painting chairs, spray painting furniture, painting furniture, painting chairs black

Back in my youth, I got my first kitchen table and chairs. I thought the chairs were so cool with natural wood seats and green legs and backs. I still have them. Now I don't think they're so cool, but I just can't bring myself to get rid of them.

They've made lots of moves with us, only to inevitably find the way to "basement status".  Today is no different - the table holds all sorts of Big A's manly stuff - like coffee cans full of assorted nuts and bolts, rolls of wire, tools, empty monster cans...

And although the chairs are still completely functional and sturdy, being frugal, they keep getting moved from storage area to storage area (read: being cheap, I shove them in various corners of the basement, rather than, say, giving them to charity).

However, cheap as I may be, I still wanted to dress them up so I painted them black. Now they'll look pretty in the corner of the basement.
 
Here they are in the back yard looking all green and boring (with that creepy wheelbarrow trying to sneak up on us).

 
First, I wiped them down really well with a damp cloth, and let them dry. I then brushed on a quick coat of Kilz primer.
 
Now don't try to live on the edge, like me, and paint the tops first. Tip your chairs upside down and paint the bottoms first, and then flip them and paint the tops. This way you don't ding the paint or primer on the top while you paint the bottom.
 
 
Next I let them sunbathe for a couple of hours until they were good and dry. (Thank goodness that wheelbarrow took off). 

 
Meanwhile, I decided to spray paint them, rather than paint them. I decided to use spray paint because with spray paint you're less likely to get brush marks or drips. I had to give them two good coats, and a very minimal third coat just to "touch up".
 
Once they were dry, I painted on a little gold glitter along the front - no reason, just because they're my chairs, and I can.
 
 
Okay, time to take 'em back down to the basement. Sad, isn't it? I still can't bring myself to get rid of them. (And I make fun of Big A for being a hoarder!)


Thursday, September 26, 2013

How To Make a Clock

I made a clock! Okay, rather, I sorta, kinda made a clock. I've been wanting to make a clock for some time. I've pinned a couple of ideas and had a few ideas of my own.


And then the other day, while cleaning in my 12 year old son's room, I found an old plastic clock, stuffed under his bed. I was loath to throw it away, so I took out the hands and clock motor thingy - (let's call it the clock mechanism).


I then threw away the carcass of the clock. Adios Amigos.

I took a wicker plate charger and shoved delicately inserted the hands of the clock into the clock mechanism in the middle of the plate charger. Obviously, the clock mechanism goes on the backside of the charger.

Hold on, I'm tired of saying clock mechanism. Let me go google what that thing is. 

Assemble the clock and its parts per the directions. If you order from Klockit, your assembly sheet will look like this.
Source

Oh, I see, it's called a clock MOVEMENT.  I like clock mechanism better after all.

So, the clock mechanism goes at the back. Making a clock is so easy! Not only can you disassemble an old ugly clock and use the parts, you can buy a kit for a couple of bucks at any craft store.
(click image to buy one for $5.99!)

Also, you can use pretty much anything as your clock face. Record albums, wood, plates, serving platters...

I really liked my wicker plate charger idea because I didn't have to drill a hole! (I know, it probably saved me all of 45 seconds in my lifetime, but these things make me happy.)

I dressed up my plate charger clock with some glass beads that I bought ages ago at the dollar store.

 
In my picture you can see the clock mechanism through the charger, but I promise you can't see it with your nekkid eye. Especially if you look at it after two glasses of Chardonnay.

I like it.

Monday, September 23, 2013

Pine Cone Decor and Centerpieces

centerpiece, fall decor, DIY centerpiece
 
For fall décor, I love pine cones. They're so interesting to look at - all that texture, and they smell good. Best of all - they're free! 
 
I'm very sloooowly starting to add some autumnal touches to the house. (Do you love the word AUTUMNAL as much as I do?) Sadly, I haven't quite embraced fall décor yet - I haven't bought any pumpkins, no mums, no corn stalk bunches... I have, however, walked around outside and picked up some pine cones. Oh yeah, go me!
 
Pine cones are one of the most simple, natural, (and free) elements you can use for your fall and winter décor. Whether your decorating your table with a centerpiece, or hanging a wreath on the front door, head out and gather up some pine cones.
 
As I mentioned, I managed to collect a few pine cones from the yard. I took what used to be an appetizer tray, and spray painted it brown. I then used the eraser end of a pencil, dipped it in gold paint, and put some gold polka dots on it.


I added dollar store candle holders, which are a gold mercury glass. It looked kinda cute, but as it's now fall, it needed some pine cones I thought.
 
 
centerpiece, fall decor, DIY centerpiece
 
 
No one has noticed, or at least hasn't mentioned the new little centerpiece on my side table, but the cat likes knocking the pine cones on to the floor. As long as he's happy. I aim to please!
 
 
Last year the little man and I walked around and collected bunches of pine cones, piled them in a big vase and added twinkle lights. He was very proud of his creation, which we plugged in all last fall and winter.
 
 
Pine Cone Theft
This year, I think I'll add a few more pine cone-y elements. I love this garland, which would look great strung across our sliding glass doors, or maybe in the bay window near the dining room table.


fall decoration 634x421 DIY:  Autumn Decoration and Centerpiece Ideas
 
And aren't these mason jar pine cone centerpieces are adorable? A couple of these would look great in my kitchen window:
 
 
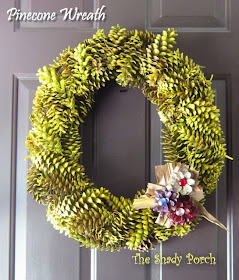
A wreath is a must this year. I have several grape vine wreaths that could easily be covered in pine cones. The Shady Porch shows us how to make a pine cone wreath. You could easily spray paint it to match whatever color combo you have going on.
 
Pine Cone Wreath for Fall #Crafts #DIY #Pine cone #pinecones #decorations #autumn #fall #wreath
 
Or, I'm loving the pine cone cluster. Ribbon, hot glue, pine cones.
 
 
Last but not least, I do like the idea of scented pine cones. However, nothing offends my nose more than those big bags of cinnamon scented pine cones at the entrance of package stores. They're too strongly. Gag. But I'm thinking, how about if I use spray adhesive and some fresh ground nutmeg? OR, perhaps a small indoor wreath incorporating cinnamon sticks? I'll keep you posted!
 
What do you do with pine cones? I'd love to hear your ideas, so leave me a comment - it makes my day!
 
Julia

Thursday, September 19, 2013

Easy Awesome Apple Pie


There is nothing better than an apple pie right out of the oven. Period. I'm not a big baker, and I don't have a huge sweet tooth, but during apple season, I feel like it's my duty as a mother to bake an apple pie. This apple pie recipe is delicious, but easy enough for even novice bakers to master.

apple pie, apple pie recipe, easy apple pie, easy pie recipe


But first, an "Apple Tale of Woe" (read: epic baking fail).

Sunday was apple picking day. It was a beautiful sunny day - brisk and a little windy. Perfect. Along with the kids, we rode on a wagon out into the apple orchard, and ate about as many apples as we picked (which, in hindsight, didn't bode well for the plumbing  probably wasn't smart, but don't worry, all was ok!).
Inspired by all things "apple", I got home and made Roast Pork Loin with sautéed onions and apples. Big A set to work on the Apple Crisp, which was going to be a great ending to a perfect day. When dinner was over, Big A pulled the crisp out of the oven, and darn! The Crisp on the Apple Crisp Wasn't Crispy.
"No problem" Big A said, "I'll just put it under the broiler". This seemed sensible.
There was one tiny little snag - our 19 year old couldn't stay for dessert and had to leave. We walked him out, and while saying goodbye, forgot all about the crisp under the broiler. I'm not sure how long we left it, but let's just say, when the smoke alarms went off, not only was the crisp blackened, but the apples were a deep mahogany.

Blackened fish is good. Blackened crisp is not.
We ran in to save the Apple Crisp (and the kitchen), while the other 3 kids raced downstairs in fits of giggles (this isn't our first rodeo with the smoke alarm system). In the end, we flung the apple brick crisp into the garbage.
Alas, Round Two. Plan B.

 apple pie, apple pie recipe, easy apple pie, easy pie recipe

Easy Awesome Apple Pie
This Apple Pie Recipe uses vanilla pudding mix for the filling, instead of sugar.

Ingredients:

1 pre-made pie crust (defrosted)
4 medium apples, peeled and thinly sliced
1 package Cook and Serve, Vanilla Pudding (3 oz box)
1/2 cup chopped quick oats
1/4 cup (half a stick) softened butter
1/4 cup brown sugar (1/2 cup if your apples are tart)
1 tsp vanilla extract


Directions:

  1. In a bowl mix together the sliced apples, vanilla, and vanilla pudding mix (DO NOT MAKE PUDDING, just use the dry mix).
  2. In a separate bowl combine the oats, brown sugar and butter
  3. Carefully spoon the apples into the unbaked pie crust
  4. Sprinkle the oat mixture on top
  5. Bake at 350 for 45 minutes. (About 3/4 of the way through I covered the edges of the pie crust with tin foil, to prevent the crust from getting too dark.)  
  6. *Do not leave the house during baking (see above)*
  7. Serve with whipped cream or vanilla ice cream.
I hope you try this easy yummy pie. I can tell you, it was a lot better than our Apple Crisp. (Not that I tried it, just in case, or anything).
Let me know if you have any interesting ways to use apples. We have quite a few left to use up!
apple pie, apple pie recipe, easy apple pie, easy pie recipe

Or maybe I'll just keep them in the bowl because they look so pretty!

Sunday, September 15, 2013

DIY Glitter Candle Holders


Sometimes on a rainy afternoon, you just have to cheer yourself up with a little glitter!
 
DIY Glitter Candle Holders, glitter project, DIY candle holders
 
I found 4 little clear glass tea light holders for 1$ at the Dollar Store. I scooped them up and brought them home with me.
 
I painted the inside of them with Elmer's Glue and liberally sprinkled with gold glitter.
 
And now look! Aren't they pretty?

Friday, September 13, 2013

How To Remove Water Rings From Wood

How to remove water rings, remove water marks


We've all seen this - the dreaded water ring. There's no avoiding them really, especially if you have kids.

remove a water mark from wood, water stains on wood, how to remove water rings

This little table was my grandmother's. It sits by the back door and is usually the landing spot for keys, the newspaper, or baseball caps. Yesterday someone left a glass of ice water on it (you know who you are, and you're getting 50 lashes with a wet noodle!)

how to remove water rings, remove water marks from wood


I saw the water mark on the table top, and was a little panicked.

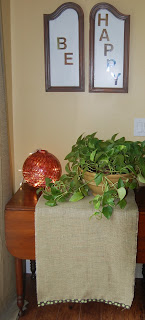
Honestly, the table isn't in the best condition, so I always have a table runner or a large plant, or both, on it.  But I can't hide a watermark this obvious! So, I put on my big girl pants and decided to fix the problem.

Here's what it looked like up close:


Ugh! I've tried to remove water stains from wood before. I've used mayonnaise, olive oil, toothpaste - none of them worked for me. I even ordered a product from those late night infomercials - and also had limited success.

Then I remembered the iron trick I've seen over the years. You take a white cotton cloth (a cloth napkin, t-shirt, white pillow case, etc. ). Set your iron to medium heat with the steam setting OFF, and "iron" the white cloth on top of the water mark. Do this carefully, and only leave the iron on the stain for a few seconds at a time.
The heat of the iron draws the moisture from the wood. I gently ironed the spot for a few minutes in total, but was a little hesitant to do it for much longer for fear of scorching the wood. Here's what it looks like now!

I know you cans still see the mark, but it's much better. And from a few feet away, you can't even tell it's there.


Phew! Panic over!

(Encouraged by the results, I also used this method to remove a 5 year old water mark from an old desk, with the same results.)

Do you know of any tricks to completely remove water marks from wood?

Tuesday, September 10, 2013

No Sew Curtains

 
Hello everyone! What are you up to this week? The weather isn't cooperating, so while I (slowly) begin on my project To Do List, I've been working on a couple of teeny-tiny projects around the house. For instance, curtains for my kitchen window. Now, I don't sew. But with a little creativity, there's no need. Well, not for me anyway! I'll do anything to avoid it...
 
no-sew curtains, kitchen decor, curtain DIY

We have a small window over our kitchen sink, which is only 29" across.  I use cloth napkins and re-purpose them as curtains. Not only do I avoid sewing, but I can change them out every week if I feel like it!

These would be perfect if you live in the city, or have neighbors that live very close, but here - there's not a sole out there.  Just woods.  And that can be a little creepy at night. So I use the curtains to let in the light in the daytime, but more importantly, I can close them when goblins are looking in at me while I do the dishes at night.   Sad, but very true.


I found some pretty cloth napkins at the DOLLAR STORE, which were - you guessed it - a dollar for the two of them. I had a tension rod and curtain clips (in white to blend in with my white woodwork), and hung them up.

Easy fix for a buck. Looove cheap, almost free, fixes.

LINK PARTIES for each day of the week. I can't say I make it to every one of these, but I'd like to!

If you have a link party I haven't listed, please email me or comment below!


SUNDAY


Sunny Simple Sundays Party at Sunny Simple Life
Sundae Scoop at I Heart Naptime
Think Pink Sundays at Flamingo Toes
Nifty Thrifty Sunday at Nifty Thrifty Things
Restyled Sundays at Stylish Once Again
Silver Pennies Sundays at Silver Pennies
Frugal Crafty Home Blog Hop at A Blossoming Life


MONDAY

Before and After at Thrifty Decor Chick (first Monday of the month)
 
TUESDAY
 
WEDNESDAY

THURSDAY
FRIDAY
 
 
SATURDAY
 

Saturday, September 7, 2013

Shrimp Rolls


I grew up going to Maine for summer vacation. I loved the Maine Lobster Rolls. Everything tasted better in Maine, but those lobster rolls were the best. Sadly, it's been years since I've been to Maine, but I still crave those Lobster Rolls. It's kind of expensive, and difficult to find lobster meat where I live, so Big A and I came up with a pretty good solution, and make Shrimp Rolls about once a week. They aren't exactly the same, but they do the trick!
 
Start with a bag of frozen shrimp. Did you know frozen is actually fresher than, well, fresh shrimp? I am not lying! The shrimpers freeze all of the shrimp at sea. The "fresh" shrimp in the display case is actually just defrosted shrimp, and who knows how long it's been sitting in the display.  And, usually, the stores charge you more for it!!! Annoying, eh?
 
So, if you want to make a shrimp roll, get yourself some frozen shrimp, and defrost it. Dry it off really well. I wrap the shrimp in several paper towels and let it sit for a few minutes before I use it.  
 
 
World Famous Shrimp Rolls
(okay, so maybe they're only famous at my house, and only to Big A)
 
shrimp roll, shrimp salad, sandwiches
 
Ingredients:
 
1 lb shrimp - if you use the large shrimp chop it into smaller pieces.
1 tsp dried dill OR 1 TBSP. fresh dill
1/2 tsp garlic salt
1 TBSP lemon juice
1/2 cup mayonnaise
4 hot dog buns - New England style
Butter


Mix all of the ingredients - except buns and butter of course! (Obvious, I know, but I feel the need to clarify that for some reason, like the warning sign on a stroller that says "do not park on a cliff"...).
 
 Anyway! We like our shrimp with a lot of mayo, but if you don't, just use less.  Chill the shrimp salad for at least a half an hour.
 
Meanwhile, open up the New England style buns, and butter both sides. Toast both sides in a frying pan over medium heat, until they are golden brown.
 
Pile on the shrimp and serve!
 
shrimp roll, shrimp salad, sandwiches
 
Note: Add 3 TBSP chopped celery if you like it. Sub cooked lobster meat, if you have it! Yummy!
 
 
LINK PARTIES for each day of the week. I can't say I make it to every one of these, but I'd like to!

If you have a link party I haven't listed, please email me or comment below!


SUNDAY


Sunny Simple Sundays Party at Sunny Simple Life
Sundae Scoop at I Heart Naptime
Think Pink Sundays at Flamingo Toes
Nifty Thrifty Sunday at Nifty Thrifty Things
Restyled Sundays at Stylish Once Again
Silver Pennies Sundays at Silver Pennies
Frugal Crafty Home Blog Hop at A Blossoming Life


MONDAY

Before and After at Thrifty Decor Chick (first Monday of the month)
 
TUESDAY
 
WEDNESDAY

THURSDAY
FRIDAY
 
 
SATURDAY