Pages

Sunday, April 28, 2013

A Portrait of Someone's Kids...

Hello and Happy Sunday!

 
I got up this morning with hopes of getting an early start. However, the Technology Gods and Mother Nature had other plans for me it seems. Really, it's their fault.

First of all, I somehow manage to turn my computer screen sideways. Hmmm. In a panic, I shut down illegally, lost all of my post, and did what any techno-master would do - got my 12 year old son up to save the day.

If you ever have the same problem, you press ctrl, alt and the arrow buttons to reposition your screen the right way up. As my son solved the problem, he said "Oh, Mom, I love you" in his best patronizing tone.  Yeah. I don't get no respect!

I then had a call from my Mom, and stepped outside to look at my daffodils and discuss the planting of my Johnny Jump Ups (I'm easily distracted). As I was planning my planting tactics, the dogs started barking like crazy. I turned to see them chasing 3 big chubby raccoons!

 
Of course I had to stop what I was doing and take a picture. I was cooing and making kissy noises, but this guy wouldn't look at me.  He was just hoping I would go away!

OK, focus Jules.  Back to the real subject!

I've been painting this picture frame for about 3 months now. Really. I originally began when we still had snow on the ground, but I came to my senses and waited for nicer weather.

So, finally, a finished frame for a painting I have of two of my kids.

(Really mean confession - It was very nice of the woman to paint my kids for me for my birthday, but it doesn't actually look like my kids. At all. It might look like someone else's kids, but it doesn't look like mine.)

This is them, when they were little cuties!


And here is the painting.


Um, not quite. Either way, I still like it, and I want a nice frame for it.

So, this is the original gold frame. It didn't look good on my gold walls, or with the gold tones of the painting.

 
Easily fixed with spray paint! 

 
The first thing I did was put a little Vaseline on the corners so that some of the gold would come through and make it look a two-toned.
 
When I got outside, things went pretty fast.  I used my folding saw horses (which are a little on the old side, but I LOVE! You can get your own below.)


The spray painting is so much easier with the handle attachment thingy. I sprayed three light coats, and let it dry for about 20 minutes between each coat.

 
Next I rubbed off the black on the corners.

 
 It looked a little bright so I just lightly dusted it with the spray paint.


And here is what the frame looks like now. It looks better! It still doesn't look like my kids, but it looks better...


So what are you up to this beautiful Sunday?

Friday, April 26, 2013

A Spring Wreath & A Wine Bag

They go together, really, they do!

BUT...
Before I get to making a wreath,
I had to show you my forsythia,
plucked from my sisters yard,
and forced to bloom in my hallway!
 
 
  NOW TO YOUR SCHEDULED PROGRAMMING:


After a little glitch this week with the computer and a Trojan Horse (who apparently was living in my hard drive), I was a little stressed out. So what is a girl to do but go shopping?

It wasn't a big shopping trip - no Potter Barn, no Pier 1, not even Target -  it didn't involve garage sales, or thrift stores or estate sales, or antique fairs. Nope, in true cheap thrifty fashion, I headed to the Dollar Tree.

Lame, I know, but the Dollar Tree did help me get a little bit of Spring on my front porch.

(I have some pansies, and I did lug and place all the pots and furniture to the porch, however, they all need plants and flowers, and I'm not quite ready yet!)

So, I thought I could at least accomplish a WREATH.

Unfortunately, the Dollar Tree didn't have a large twig wreath, as I was hoping, but they did have smaller sizes, so I bought two.  


I also found some bright pink fake flowers - the two tiny little bunches looked okay, especially if deconstructed - and by deconstructed, I mean cut up with toddler scissors.

With my Glue gun and a little ribbon I was done in half an hour.


So what do you think? I kinda like the simple pink, but I wonder if I should add some greenery?  We will see, things have a way of changing around here.


Now to hang, I used a command hook on the inside of the door. Don't worry, if you do this, it doesn't look so obvious from the inside of the room, but its the easiest way (for me) to hang a wreath.


Now, Spring also means it's Mothers Day SOON!  I know it's not about gifts, but I love being able to do a little something for my Mom, and my Mother-in-Law, and any of my fave Moms... Here are a couple of cool ideas I ran across this week, maybe they would work for your Mom!

I was on Pinterest and saw this cute work bench for a gardener, handymom (oh yeah!), or DIYer... At $69 it's a steal! PLUS, it's got 299 reviews, at 4.6 out of 5 stars! 


How about wine? Or better yet, a wine bag!  Now, I'm in no way implying that my gorgeous mother drinks boxed wine, but if you happen to know a Mom that likes a glass of wine, what's better than this? Seriously, take it on the boat, on picnics, to the mall:


He, he!  Now, I know you love making things for Mom - for a more homemade kinda day, head over to Setting for Four for the cutest homemade gifts ever! I love all of the cute projects there, especially the coasters. Go check it out, or of course, you could make your mom a Dollar Tree wreath!
 
Have a wonderful weekend!
 
 
Follow my blog with Bloglovin

My Doggie, Winnie, and I were featured! YAY!

Monday, April 22, 2013

Got Five Minutes?


Hello there! It's another beautiful day here - cool, but sunny. I just put a pot of pansies on my front porch (thanks Mom!), and I feel like it's really here. Flowers and GREEN grass are just around the corner!

One of my favorite Spring time things to do is force forsythia into bloom, but I (just) realized I don't have a forsythia bush at our new home! Bummer! Thanks to my sister, who has a whole slew of forsythia lining her driveway, fear not! I just filled the trunk of my car with branches. When I got home, I put the long, lanky branches into a vase of water.

They look like H-E-double toothpicks to begin with, but within a couple of days, they'll be a mass of bright yellow blooms! Here they are looking less than beautiful, but give me a few days and I'll post what they look like in full force.


While I was at my sisters, I snapped this picture of their woods - how sweet is it with the daffs popping up all through the woods?


It was beautiful!

I got home and had a little time to myself, so I did a couple of tiny projects.  I looove finding time to whip up something decorative or crafty. 5 minutes works for me!

We have an old step stool, that my sister and I had as kids, that now my lil man uses to brush his teeth.  The wear and tear on the stool is genuine - no sanding involved - so I just stenciled his name. If I have to trip over it every day, it may as well look cute!


While I had the stencil stuff out, I stenciled a K onto a piece of scrapbook paper, framed it, and hung it in our little half-bath. I framed two other pieces of the paper and hung them too.


They're just 12"x12" frames, but they take up quite a bit of wall space once grouped together.

 
Over the past few months, there were a few inexpensive, easy projects I did in under an hour.
 
I love this little recipe frame. I printed up two recipes on some brown packing paper, and staple gun in hand, I went to work.  I just measured the frames and the ribbon, and stapled the ribbon right to the back of the frames.  I left about 3" at the top and bottom. To hang, I used Velcro! It hangs by my pantry. And since the recipes are family favorites, I love seeing them everyday.


The little man and I painted these little mirrors that have been kicking around for years. We just gave the mirror a coat of white paint, over some vinyl letters, let dry, and peeled off the letters.


I love decals! I bought these from Amazon, for about $5 each, just followed the directions.  The first decal perfectly describes my family, and it makes me happy.

 
The second one, well, you know, I like to laugh. 


For my utensils in the kitchen, this is a dollar store vase, filled with dried lentils. (My spices and herbs from a local Amish store, are just stacked and left by the oven, I like the colors - and why change the packaging when they look so pretty? 

 
Two pretty napkins found at Pier 1, hung on a tension rod in over our kitchen sink, took about 3.7 seconds to "make".  


 There are so many more! And so many more I want to do... What are some of your quick décor projects or ideas? I would love to hear them!

Have a wonderful day! I'm off, rake in hand, to get some fresh air!
 
Party Time:
 
Tuesday

Saturday, April 20, 2013

Got a Sharpie?

Hello there and Happy Saturday! It's that time of the week where I take a few minutes and make a list of the things I want to get done in the following week. Not that they WILL get done, it's just a wishful thinking list - with good intentions!

I went to my Pinterest boards and looked at the pins I have been loving. Seems there are a lot of ideas out there for using Sharpie Markers. (The only thing I ever do with a sharpie is make sure it's hidden at the BACK of the drawer so the little man doesn't get his hands on one! I don't need permanent marker all over my counter tops or walls!) But it seems some people actually have used their sharpies for good use!

Check out all of these ideas - and if you have any sharpie inspired DIY, please share!

First of all, I love this lampshade which was given a super cool update with a Sharpie! Who would have thought - and who would have thought there was a blog all about things you can do with a sharpie! Check it out HERE.


All you need is an old lamp shade, a template, and a sharpie! Nice!

Speaking of nice... This sign was made simply by printing out a verse and transferring it to a piece of wood, and then coloring in the letters with the sharpie. It doesn't get any easier! I have to try this! (For the tutorial go here.)


I was at the dollar store this week, and they seem to have a huge selection of plain white boring ceramics - dinner plates, mugs, bowls. There are tons of pins using sharpies and white dinnerware. They are all so cute!

DIY Sharpie plate from The Sweetest Occasion

In this tutorial, you are shown how to make sure your chosen design won't wash off.

I have burlap, I have sharpies.... Check this out:


I don't have a chair to recover, but I like the idea of making something with the burlap. Maybe decorating a table runner, or framing our family name, or somethin'!

And for the last sharpie idea I really, really, really want to do ... plain old ceramic drawer pulls (which are about $14 for a 4001-WT (Pack of 10) Round White Ceramic Cabinet or Dresser Knob ), sharpie and your oven.

(Note: I can't get a link to work for this photo - I apologize, but the instructions seem to be the same as above, 350f oven for 30 mins and let cool).

SO I guess that's enough to get me started for next week. I will let you know how I get along with these sharpie projects. Have a great weekend and let me know what you are up to!


Friday, April 19, 2013

Must Have Tools For the Home

Hi there!

I was thinking about the tools that I would like (cuz my birthday isn't too far away), and about the tools I use all the time, and I thought it would be fun to put together a list of my must-have tools. Some I use every day, some just once in a while - but I like owning them, rather than having to borrow them. (It doesn't count as borrowing if they're technically my husband's does it? Or my Dad's? Or the neighbors? Good.)

Some of these tools I use for crafts/projects and some I use around the house for everyday upkeep.

SO, without further ado, here's MY list of must-haves (with links if you like or find any of these things in all of the big package stores).

Leatherman. I keep this in the kitchen drawer. It has just about anything you need to accomplish small tasks without having to lug out a heavy tool box.  A screwdriver, can opener, pliers, little scissors, jack-knife, mini-saw, even a beer opener! These are invaluable for the home and for travel - I take mine camping. They also make great gifts!


Cordless Drill. I use this every week. If you have a home, you'll need it to hang curtains, shelving, or to put most anything together. Try to get one with a decent sized battery because there's nothing worse than running out of juice mid-project!


Portable Light. We have a couple of portable lights, but I like the short type so that they fit on a table top.


Staple Gun/Glue Gun. Both are very inexpensive, and I use mine every week, if not every day. Actually I have several of each.


Spray Paint Adaptor. Cheap, so get one! Trust me hand cramps are not necessary.  Get one of these and make spray painting a whole lot easier!


Saw Horses. I have metal saw horses that fold up and have a carrying handle. Throw on a piece of plywood, and it's the perfect work surface for outside, or for an extra work surface anywhere.


General tool box. Big A has tool boxes as tall as me, but all I really need is a small, general use toolbox.


There are a lot of other handy tools you could invest in, but these are truly on my daily rotation. And here's a list of general tools you might want to keep on hand:

Utility knife
Paint brushes/sponges
Tarps/drop clothes
Different length levels
Tape measures
Wood Glue
Paint buckets
Eye protection
Gloves

WHAT WOULD YOU ADD TO MY LIST???


Wednesday, April 17, 2013

DIY Candle Holders

Hellooo! I made a couple of candle holders today, but it was a long morning before I got to them!

DIY Candle Holder, candle holders

This morning was the kind of morning I know you all can relate to. It goes like this...

I wake up vaguely aware that morning is imminent. But I fall back asleep.  Bliss. Those last few minutes before the alarm are ALWAYS the best! 

As I was happily dreaming, Big A apparently hit "snooze", and I didn't wake up until 6:45 - which is fine, except I leave the house at 7:10.  We have two teenagers who attend two different schools, so we have an early start. I managed to slug down one gulp of coffee, and that's it.  Let's just say I don't do well without coffee, and wasn't looking my best at drop-off. Forget Soccer Mom, more like Horror Mom. This is what I look like when I don't have time for coffee:


That might actually be a little generous, I think I looked worse than that... This is how the kids were looking at me:


I skulked and slithered my way home, and managed to pull myself together for the day. (And by pull together, I mean  - drink a gallon of coffee.)

It's our little ones birthday this week, so it was his party this morning at preschool, where the tradition is for the parent to cook the child's favorite food for his or her birthday.  Most kids choose cookies, or pudding, or cake. I am lucky enough to have a four year old whose favorite food is meatballs. You can imagine how easy it is to mix up and cook meatballs with 15 preschoolers! And, you know, nothing screams BIRTHDAY like a meatball.  Most of the kids kept asking "But where's the cake?". And who could blame them?

Anyway, the morning is now over. I'm now looking forward to a better start tomorrow, and to the weekend! Saturday is my step-daughter's wedding shower!

So, in my spare 3 minutes, I thought I'd quickly show you an easy and inexpensive gift you can either give to yourself, or to someone else. I made these cute prizes for the shower:

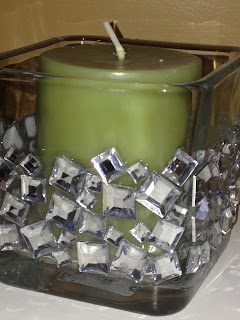
The dollar store really does have some decent glass candle holders, vases, wine glasses etc. For a dollar how can you go wrong? And with a few minutes of time, some glitter, bling, and some glue - you have a cheap and cheerful gift.
 
I use this glue - not only does it have a little built-in brush (handy), it also dries clear. Note that the hardest part of this project is opening the glue.


To open glue:
 
1. Happily pull glue out of your cupboard/desk and try to open it. Notice that the cap will not budge.
2. Think... Hot water.  Run top of glue under boiling hot water.
3. Try cap again and notice that now it is "slippery when wet"
4. Think... knife. Run the knife blade under the cap. (Careful!!!)
5. Try cap again and notice how it is now mangled from the knife.
6. Think...More hot water.
7. Try mangled cap again. Rejoice!!!
 
Next, I have all sorts of glitter and beads and DIAMONDS!
If you do not, try the dollar store, or Michaels, even WalMart.
 

Take your plain Dollar Store candle holder. I had this one and I wanted to put the diamonds on it. To ensure a little of the candle showed, I just taped off some of the glass with painters tape, see below.


Next I brushed on the glue (generously) and added the diamonds. Notice my very precise placement? Yeah, that was hard, but I try to persevere!  

 
When dry it looked like this.


I also bought these dainty little candle holders and just brushed the glue inside, and sprinkled with gold glitter. After a few hours drying they looked like this.


I hope the girls at the wedding shower like them! Now I'm going to pick my kids up from school and try not to scare the children again.